
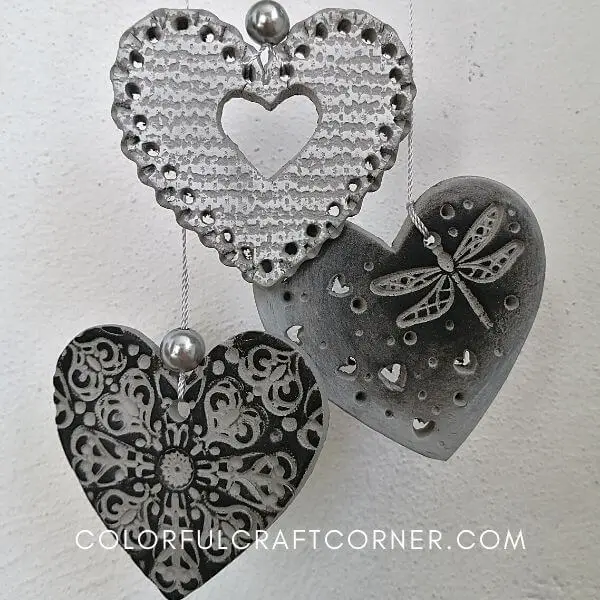
DIY Heart Ornaments out of Air Drying Clay
One of my favorite things to make out of air dry clay is ornaments. Air hardening clay has been my new ‘craft love’ for the past weeks or months. It’s so easy to work with, IO can customize it in many fun ways.
I love, love, love it!
So, I decided to make a couple of ornaments. I chose heart ornaments because they are perfect all year long. I can put them up for Valentine’s Day, for Christmas, or just incorporate them into our home decor.
With this clay project, my second goal was to show you how you can use the same cookie cutter to make various and so different ornaments by adding texture, colors, and designs.
DISCLOSURE: THIS POST MAY CONTAIN AFFILIATE LINKS, MEANING I GET A COMMISSION IF YOU DECIDE TO MAKE A PURCHASE THROUGH MY LINKS, AT NO COST TO YOU. PLEASE READ MY DISCLOSURE FOR MORE INFO.
I’ve experimented with DAS Stone Effect Clay and with adding texture to the clay. If you haven’t tried DAS Stone Clay, check out my in-depth review.
Let’s dive into ornament making!
Clay Hearts Supplies
You will need minimal tools and supplies for this clay craft. If you’re a regular crafter you may have everything at home.
- DAS Stone Effect Modeling Clay (but you can use any other air hardening clay),
- a big and a small heart cookie cutter,
- metallic charms, textured paper, lace, or anything to add texture,
- soft pastels (I used white and black),
- plastic straws (a larger one for the holes and a smaller one for decor),
- rolling pin,
- plastic wrap,
- toothpick.
HOW TO CRAFT WITH AIR MODELING CLAY
- How to Color Clay
- 7 Tips on How to Make Air Hardening Clay Crafts Stronger
- Dry Air Modeling Clay the Right Way
- How to Stop Air Dry Clay from Cracking
Step-by-Step Instructions
You can read the instructions separately for the three clay heart ornaments or if you want to see me doing them jump to the video and watch it.

Filigree Air Dry Clay Heart Ornament
Step 1 – Roll out the air modeling clay to a 1/6 inch thickness.
Step 2 – Pick a metal filigree and push it into the clay. If it’s big enough you can apply it once or puzzle it together to cover a larger area. You can also use more than one for a ‘patchwork’ look.
TIP! To transfer the design perfectly to the clay, use a bamboo stick or toothpick to push every curve and part of the filigree into the clay.
Step 3 – Find the most beautiful part and use the heart cookie cutter to cut out the shape.
Step 4 – Pick a soft pastel (I used black) and rub it to your finger. Transfer the pigments to the clay by gently dabbing the protruding parts.
Step 5 – Cut out a hole with a plastic straw.
Step 6 – Lay it on a baking rack so it can dry evenly.
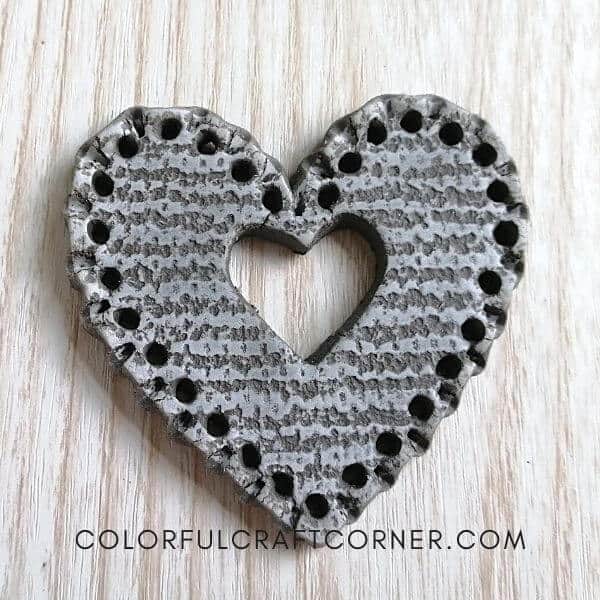
Lacey Clay Heart Ornament
Step 1 – Grab a piece of clay and knead it for a couple of seconds.
Step 2 – Roll out the air drying clay to a 1/6 inch thickness on a piece of plastic wrap.
Step 3 – Lay your textured paper on the clay and slightly push it. Make sure that the paper doesn’t move.
Step 4 – Use the larger cookie cutter to cut out the ornament.
Step 5 – Place the smaller heart cutter slightly higher than the middle and cut it out.
Step 6 – With the thinner plastic straw, poke holes at the edge of the heart.
Step 7 – Rub the white soft pastel to the tip of your finger and transfer the pigments to the ornament. Don’t push it into the clay, just dab it carefully.
Step 8 – Use a round-tipped tool (I used a screwdriver, but a pencil or bamboo stick is also perfect) to push the edges between the holes, to create a lace-like look. I pushed the tool both from the top down and also from the outside in.
Step 9 – Leave it to dry. Use the small heart in the middle to attach a string. Add a pearl to make it look nicer.

Dragonfly CLay Heart Ornament
Step 1 – As usual, roll out the clay to be approx. 1/6 inch thick.
Step 2 – Design your ornament. I picked a dragonfly ‘theme’ because I admire them.
Step 3 – I pushed slightly the heart cookie cutter into the clay for guidance.
Step 4 – Push in your picked charm into the top right corner.
Step 5 – Cut a smaller piece of plastic straw. Flatten one side. Push in one of the tips to create a tiny heart. Cut out a few hearts.
Step 6 – Add small dots with a pointy screwdriver, pencil, or another pointy tool where needed.
Step 7 – Cut out the ornament using the cookie cutter.
Step 8 – I used both white and black soft pastels to create an ombre look. Pure black at the dragonfly and white at the edges. I mixed them in between in a circular pattern.
Step 9 – Create a hole so you can hang it.
Step 10 – Lay it flat and dry it thoroughly.
Video Tutorial
I think watching is more entertaining than reading so here is a short video tutorial for all three air dry clay heart ornaments.
Clay Heart Ornament Tips and Hacks
- Use white DAS air dry clay if you want to make more colorful ornaments. Add pink or red soft pastels for Valentine’s day or color clay (Check out my article on how to color air dry clay).
- To avoid curling, dry them on a piece of parchment paper first, until the outer layer is almost dry. Flip them occasionally. Then you can transfer it to a baking rack so they can thoroughly dry (it’s optional, if you put them on the rack first they are more likely to distort). For more tips on how to dry air dry clay properly check out this article.
- Paint and decorate after they have fully dryed. For example, add pearls or beads, small bows, etc.
Final Thoughts about the Clay Heart Ornaments
As you could see, one of the easiest ways to create heart ornaments is using air drying clay. You can customize and fully personalize.
It’s the perfect beginner clay craft. Air hardening clay is wonderful! You can create Christmas ornaments together with your children. They are almost fail-proof!
I hope you like this craft. Happy crafting!
Have you ever made clay ornaments? Leave a comment!
Related Air Drying Clay Crafts:
- Simple Clay Mandala Jewelry Dish
- Adorable Air Dry Clay Gnome Planter
- Easy Air Hardening Clay Birds
- Cute Clay Bunnies
