
Does air dry clay crack?
If you’re a regular air dry clay user you may ask yourself: why does my air dry clay keep cracking? Nothing is more annoying than a clay creation you spent hours on creating that eventually cracks while drying.
I know the feeling! This is why I decided to share my tips and hacks on how to stop air drying clay from cracking.
Are you new to air dry clay crafts? Will all your air dry clay crafts crack? Of course not!
Now, let’s dive in, what makes clay crafts more prone to cracking.
DISCLOSURE: THIS POST MAY CONTAIN AFFILIATE LINKS, MEANING I GET A COMMISSION IF YOU DECIDE TO MAKE A PURCHASE THROUGH MY LINKS, AT NO COST TO YOU. PLEASE READ MY DISCLOSURE FOR MORE INFO.
Why is air dry clay cracking
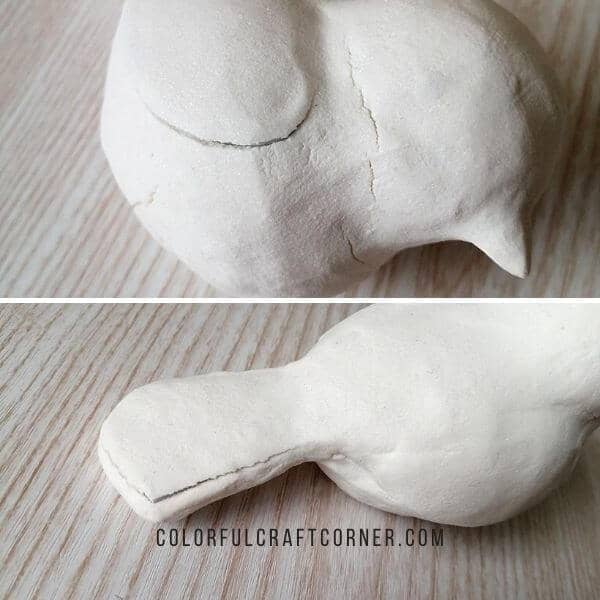
The answer is simple, shrinking makes air dry clay crack. Air dry clay doesn’t need a kiln or oven to cure, it will harden naturally in a couple of days. However, as water evaporates from the clay it makes the clay slightly shrink. This is a normal process, take into consideration when crafting with air modeling clay.
What causes air dry clay to crack
How shrinkage causes air dry clay to crack you may ask. In my experience, these are three major causes that make clay prone to cracking:
1. Drying it too fast
Air dry clay dries from the outside in. If your environment is too hot, or you try to speed up drying (with a hairdryer, putting it in a hot oven, etc.) the outer layer dries too fast, and as the clay shrinks it’ll crack.
The best practices: place your clay craft in a warm and well-ventilated room. Rotate occasionally, so it would dry evenly.
Check out this article if you want to know how to dry air modeling clay the right way.
“I dried it properly, so why did my air dry clay crack?”
Then you may have the second issue when the clay couldn’t shrink.
2. No room for shrinking
This happens when you use an “armature” for your clay project. For example, you create the “skeleton’ of your clay sculpture using wires and aluminum foil, or styrofoam; when you cover a jar with clay to create a fairy house, etc.
Aluminum foil is more forgiving, it leaves some room for the clay to shrink, however, the other rigid armatures make the clay crack. If your armature is round or has protruding parts, it makes it more prone to cracking.
3. Too much water
Using too much water while modeling air dry clay will increase the chances of cracking.
It is recommended to wet your hand when modeling clay, and you should keep your clay moist while working.
As you mold and knead clay water will evaporate and your clay becomes stiffer. Adding small amounts of water is crucial to prevent small cracks. To prevent the clay from drying out too quickly, mist the clay occasionally while modeling. Never oversaturate the clay with water.
Don’t get discouraged if you have a cracked air dry clay craft! I have some tips on how to prevent cracking. Also, how to fix them if they’ve already appeared.
Air dry clay cracking fix
Air drying clay is such a wonderful and forgiving craft material. There is always something you can do to fix cracks, distortions, unevennesses on clay crafts.
1. How to get air dry clay not to crack
It’s always better to prevent cracking than to fix it. Not only for esthetics but too many big cracks will also make your clay project weaker and more likely to break.
If you want to keep your air dry clay from cracking you need to use, dry, and store clay properly.
Avoid cracking by following these tips and hacks:
1. CLAY THICKNESS
Clay thickness can affect drying and makes the craft prone to cracking in two different ways:
– Optimal thickness
The recommended thickness for air dry clay projects is 1/4 of an inch. It’s optimal because your clay project won’t crack easily and also stay strong and durable. In my experience, an 1/6″ thick piece of air drying clay is also strong and won’t crack.
If you roll out your clay too thin (less than 1/8″), it is more likely to crack and it’s the major cause of curling and deformities too.
– Consistent thickness throughout the project
Consistency is more important in my opinion. A piece of air dry clay projects that’s thin clay parts on one side and thicker parts on the other is more likely to crack and become wavy.
2. MAKE THEM IN ONE SHAPE
Single-piece shapes are the strongest like, bowls, plates, pinch pots, etc.
Whenever you can, try to make them in one shape. For example, if you want to create a clay gnome, shape a cone with a chunk of clay. Then grab some sculpting tools and instead of attaching the nose, legs, hat, etc. separately, use your tools to model it from the base.
3. CREATE STRONG JOINTS AND SEAMS
If you need to join two parts, endings, etc. or you want to add delicate parts, make sure you create a strong bond. Joints, seams, attached details are more prone to cracking.
To create a strong bond, score both pieces with a toothpick or craft knife in a crosshatch pattern. Add water or slip before working them together or firmly pressing the detail to the body.
Slip is better, especially when you have very delicate details, it’s like clay glue.
You can create slip by adding clay scraps into a small cup of water and mixing it into a paste. Use your fingers or a brush to apply ‘clay glue’ to your crafts.
4. DRY IT SLOWLY
Drying is crucial for air hardening clay projects. As I mentioned before, in my experience, it’s the most common cause of cracking.
It’s always best to dry it slowly, maximizing airflow by rotating the object, and not painting or sealing it before it has fully hardened.
This is how I dry my air-hardening clay projects so they won’t crack.
5. STORE CLAY THE RIGHT WAY
Air hardening clay starts to dry as soon as you get it out of the package. So, if you have leftover clay, after a project, you should keep it in a container or bag, so the moisture won’t evaporate out the clay.
The fresher the clay the easier is to work and the results will be better. Old, half-dried, crumbly clay will crack as you model.
The best ways to store leftover air dry clay to keep it fresh are airtight containers like these or ziplock bags. When I use a bag, I close the ziplock and leave only a tiny gap open, Then a push out as much air as I can and close the bag.

2. How to fix cracked air dry clay
What to do when air dry clay cracks?
Cracks in air drying clay crafts are normal. And the good news is that you can easily fix them, you don’t have to throw your crafts out.
First of all, try to fix them as soon as you notice any cracks. It’ll look nicer if you can patch the gaps while they are still kind of wet.
However, don’t get discouraged if your clay craft has already dried, you can still fix it the same way!
- For small cracks: mix water with scraps of clay until you get the so-called ‘slip’. It should have the consistency of a paste. Use your fingers or a brush to fill in the gaps.
- For big cracks: grab a piece of soft clay and push it into the crac and smooth it out. This will also shrink slightly, so it may subside after it dryes and you have to repeat. I like to push in more clay, so it slighlty protruding, and smooth the excess out with sandpaper after it had hardened.
Air dry clay that won’t crack
The sad news?
Most natural air dry clays will crack. For example, brands like Crayola, DAS, Amaco, Activa Plus, Jovi, and also most handmade air drying clays like baking soda and cornstarch clay, the salt dough, etc.
However, there are some exceptions.
Best non-cracking air dry clay
The best air dry clay that doesn’t crack is the epoxy air modeling clay. It has several other benefits against its competitors: it’s stronger, waterproof, dries faster, and also acts as a strong adhesive. The only downside is that it contains chemicals.
If you want to create thin and delicate crafts like flowers, jewelry, use the Japan Hearty Clay (or other brands of cold porcelain). It’s lightweight, dries flexible, you can use it in molds, cut it with a scissor after it had hardened, and it also comes in beautiful bright colors.
How to make air dry clay that won’t crack
You can easily make homemade air dry clay from various ingridients. There are available several recipes online. But as I mentioned before most of them will crack.
I have found a couple of no-crack air dry clay recipes. I’ll be honest, I haven’t tried them. I did make homemade cold porcelain. They said it won’t crack, well for me it did. I’m not sure if it was me, the glue, the recipe, or I haven’t conditioned it properly. I do plan to try it again when I have time.
If you want to try to make homemade cold porcelain check out this video tutorial.
This paper mache clay from Ultimate Paper Mache looks amazing and promising! You can spread it in a thin layer without cracking. This will be the next homemade clay I’ll try!
Conclusion about how to prevent and fix cracked clay
I hope I could help you with these tips and hacks on how to keep your air dry clay from cracking. You shouldn’t get discouraged if cracks appear, because as you can see, they can be easily fixed.
Don’t forget the best practices when modeling with air drying clay. The most important takeaways are: add as little water as you can, create strong joints, dry it slowly.
I hope you liked this post!
Related air dry clay articles:

Some types of china clay became cracked after drying although drying is very slow , temperature is 28 c and humidity is 65 , are the reasons of these cracks related to particle size distribution or other to things , please explain in details
Thanks
Regards
Sorry, I don’t know. I never used china clay.