
How to make a wire and nail polish Christmas tree
This blog post will show you how to make lovely nail polish and wire Christmas trees. You may have seen other wire tree tutorials on Pinterest or Youtube. Still, I decided to adapt the idea to a pine tree and turn it into a tabletop Christmas tree to decorate my home office table for the holidays.
The first time I made a nail polish and wire tree were in a camp when I was a kid. I remember I loved it and tried it again after we returned.
I was organizing my stuff around the house two years ago and found a big box of old nail polish. I decided to make a nail polish craft, and that summer camp popped into my head, and I created these mini wreath ornaments.
Last year I didn’t have the time to make this wire Christmas tree, but I could finally make it. You can buy almost everything from your local jewelry supplies store and start creating.
I hope you’ll like it and try it!
DISCLOSURE: THIS POST MAY CONTAIN AFFILIATE LINKS, MEANING I GET A COMMISSION IF YOU DECIDE TO MAKE A PURCHASE THROUGH MY LINKS, AT NO COST TO YOU. PLEASE READ MY DISCLOSURE FOR MORE INFO.

Tools and supplies
- 26 gauge copper wire (0.4 mm jewelry wire),
- nail polish,
- popsicle stick (dimensions 4.5 x 0.4 x 0.1)
- round Toho seed beads (Silver Lined Rosaline, size 8/0),
- varnish or wood glue,
- ruler,
- scissor,
- plier,
- air dry clay or plaster,
- a small container.
Step-by-step instructions
Prepping
Measure and cut the wire. I used a 0.4 mm copper wire and cut it into 50 cm (approx. 20 inches) pieces, 26 total.
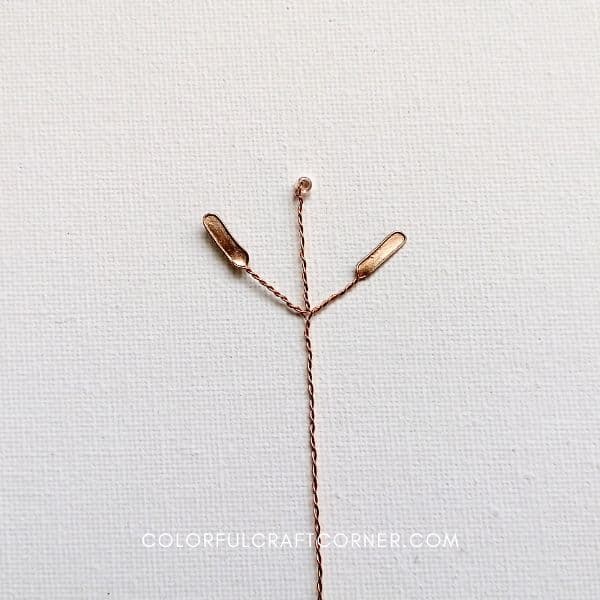
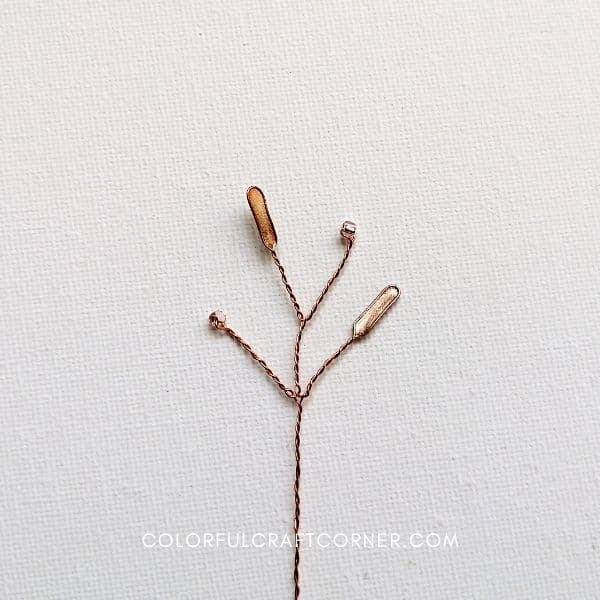
The tree trunk
Technically, you will create the tree trunk as you wrap all the branches around one center piece. First, you will create the center stem with the star tree topper.
The center and star tree topper
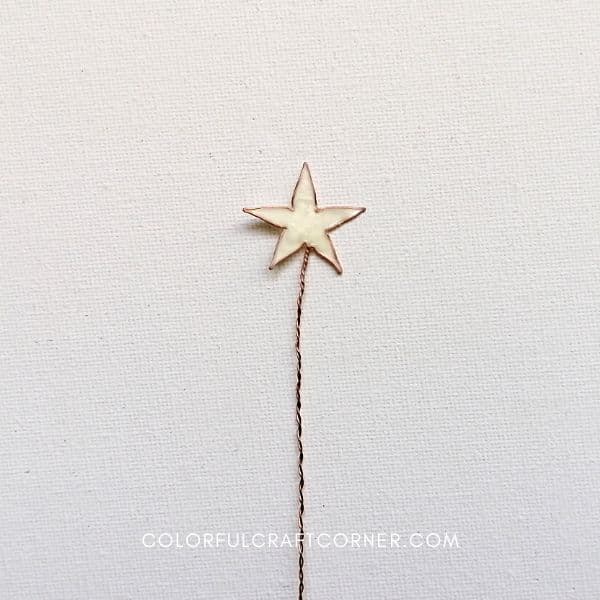
I’ve decided to shape the star using the wire, but you could use a star bead instead.
Fold the wire in half. Measure 1 cm on each side and fold it like an accordion. you’ll need ten folds until you have five “spikes” at the top and six at the bottom.
Align the two last folds and twist the wires together. Open up the folds and arrange them in a star shape.
Dip the star topper into wood glue, lacquer, or a varnish (I used a water-based varnish). Let it drip to get rid of the excess. Leave it to dry for a couple of hours. Apply 1-2 coats of nail polish.
PRO TIP: Move the star around so the liquid can spread evenly. Don’t let it accumulate in certain areas because it may break the layer.
The branches

The fastest way to create the needles is by using an ice cream stick. Mine was 1 cm (~0.4″) wide, but you can pick any size. I added transparent pink Toho beads to make it more elegant.
NOTE: I regret not using white beads, the pink ones blended in too much, also they would have matched the star better.
Model A
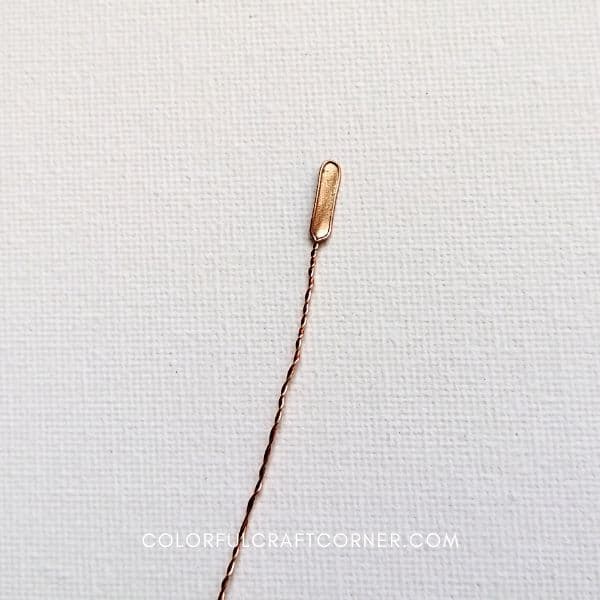
You will need to create a single needle for the first branches. Fold the wire in half, place the ice cream stick and wrap the wire around it. Twist the wires all the way down.
Create three pieces.
Model B

You will create a needle and a side branch with a bead for this type of branch.
Start with the needle (like the previous branch), twist it 7-8 times, then measure a 1.5 cm (~0.60″) wire on one of the wires. Add a bead, wrap it until it meets the other twist, and continue wrapping until the end.
Make four branches.
Model C
Fold the wire in half and add a bead. Twist it 14-15 times, then create two side branches with a needle. Finish it by twisting the wires to the bottom.
Create five pieces.
Model D
Repeat the steps in MODEL B, when you are done, twist them 7-8 times and create two side branches: one with a needle and one with a bead, on the opposite sides.
Make six branches.
Model E

You will start off like MODEL C, but after 7-8 twists, you will create another set of branches with beads.
Create seven pieces.
Painting
When all your branches are ready, start painting! Add one or two coats of your favorite nail polish. Hang them to dry.
Assemble

Start twisting the branches from model A to E. Leave a 1.5 cm (~0.60″) stem for each branch.
Shape the branches and needles. I lightly curled them upwards. The nail polish is pretty flexible, however, don’t panic if one of them tears. Remove the residue with a toothpick, dab a Q-tip in nail polish remover and clean the wire. Apply a new coat of nail polish, and you’re done!
Arrange your tree until you’re satisfied with the look.
NOTE! Do not cut the excess wire at the bottom. Shape them into a small ball or circle. It’ll make it stick better to the base and make the tree more stable.
The base

First, I wanted to use plaster but couldn’t find any at home. I used air-dry clay instead, which seems a better option because you can control it. I wrapped and molded a ball of clay around the tree’s base, then pushed it into a small plastic container (it was a broken led-operated tealight’s plastic cover). Remove the excess, smooth the imperfections and let it dry for approx. 24-48 hours.
I popped mine in a glass tealight holder, but you can sand, carve and paint the clay base for a fun look.
Video tutorial
I hope my instructions were somewhat comprehensible. If not, here is the video to follow along.
Tips and hacks
- You can use any small beads, it looks fantastic with small crystals or pearls too.
- Add a star bead on the top. Pick something lightweight, or use a thicker gauge for the center.
- Scale it. Use a thicker gauge and add tiny jingle bells. You can make the needles larger, but after a certain size, you will need to dip them as I did with the star topper.
- I wasn’t stressing about making the branches identical. You won’t see a single branch identical to the other in nature, so making them imperfect creates a natural look.
Conclusion about the wire Christmas tree
This simple wire craft is pretty simple and looks chic. You can make it in a variety of colors to match your decor. It can be perfect for your decorated mantel or as a tiny table centerpiece.
I’m not going to lie, it is a bit time-consuming but worth your time!
It took me a couple of hours to create the branches, let the paint dry overnight (I just didn’t have time to finish it the same day), then assemble the tree the next afternoon.
I hope you liked my mini wire tree tutorial. For more cool wire and nail polish crafts, check out the section below!
Other wire and nail polish crafts:
- DIY Wire and Nail Polish Mini Wreath Ornaments,
- Chic Dragonfly Pendant Using Wire and Nail Polish,
- Beautiful Wire and Nail Polish Necklace,
- How to Make Wire and Nail Polish Flowers.
