
3 Easy Wire and Nail Polish Flower Tutorial
In this post, you can learn how to make stunning flowers using wire and nail polish. They are super easy to make, fun, and cheap to make. I will show you how to make simple round petal flowers, roses, and daisies, but you can apply these techniques to create other flowers too.
If you are already familiar with my blog, or you’ve read a couple of my posts, you may know that wire and nail polish and air dry clay DIYs are my current craft loves.
I’ve already made mini wreaths and a dragonfly using nail polish and wire. You can check out the wire dragonfly tutorial here and the nail polish mini wreath instructions here.
While browsing Google and Pinterest, looking for craft ideas for this Spring, I came across the nail polish flowers.
What I’ve noticed is that almost everybody is making the simple four or five-round petal flowers. Which is fine, but you can make so much more. So, I’ve decided I will show you how to make other types of flowers easily.
These sweet, little flowers are perfect for jewelry. You can also decorate bobby pins and other accessories. Use them to make gorgeous flower crowns or mini flower centerpieces for your home office desk.
Now, let’s get started!
What do you need for the mini flowers?
DISCLOSURE: THIS POST MAY CONTAIN AFFILIATE LINKS, MEANING I GET A COMMISSION IF YOU DECIDE TO MAKE A PURCHASE THROUGH MY LINKS, AT NO COST TO YOU. PLEASE READ MY DISCLOSURE FOR MORE INFO.
Tools and supplies to make nail polish flowers
To get started, you only need wire and a bottle of nail polish.
When I create flowers by wrapping the petals around the stem, I use superglue to fasten the wire. So, they won’t move or unravel.
- wire (color of your choice) 0.3-0.4 mm,
- nail polish (assorted colors),
- superglue,
- tools to shape petals (optional)
- green thicker wire for the stalk (optional),
- filigree bead caps (optional).
How to make simple flowers out of wire and nail polish

The easiest and most commonly seen nail polish flowers are the ones with four or five round petals.
You can either create them by using a pencil, ring maker, any other round tool or simply shaping them by hand.
STEP 1: Cut a piece of wire and find a pencil for shaping.
STEP 2: Start creating the petals. Don’t start from the very beginning. Leave a 1-inch long wire so you can wrap the endings together. Wrap the wire around your tool and twist it 2-3 times.
STEP 3: Make the following petals as close as possible.
STEP 4: Connect the endings to ‘close’ the flower.
STEP 5: Paint the petals with nail polish.
STEP 6: Wait for the nail polish to dry completely. Add another layer if you’re not satisfied with the first coverage. Gently shape the petals for a more realistic look.
STEP 7: Decorate the flowers by adding pearls, rhinestones, leaves, or add spots and lines to emphasize the petals.
STEP 8: Enjoy your gorgeous flower!
Check out the video tutorial!
TIP! They are perfect on their own for decorating, or you can make multiple four-petal flowers to create other complex flowers like hydrangeas, lilac, or lavender.
How to make a daisy out of wire and nail polish

A fork is perfect to create long and thin petals for flowers like daisies.
With this technique, you can create other, similar-looking flowers like gerbera or sunflowers.
STEP 1: Create the petals as I described above.
STEP 2: Make two lines with 8 petals on each.
STEP 3: Cut a piece of wire for the stem. Fold it in half and twist the two wires together. Cut another wire, fold it in half and wrap it around the top to create the ovary.
STEP 4: Arrange the first layer of petals, tie it around the ovary and fasten it with a drop of superglue. Proceed the same with the second line of petals.
STEP 5: Yay! Now you can decorate with your beautiful nail polish daisy!
Take a look at the video tutorial to see the creation!
How to make a rose with nail polish and wire

The method of making rose is a lot like the previous one. You will only take an extra step at the end. But let’s see how to make them.
STEP 1-2: Follow the steps described above. The only difference is that you’ll need two different sized tools, a smaller and a larger.
STEP 3: Create three petal lines, two with the smaller tool and one with the larger. Make the petals as close as possible in the first row. Then leave more room between them in the other two.
STEP 5: Shape the petals to look more natural. I found a round tip plier works best for this step.
STEP 6: Paint the petals with nail polish and leave them to dry.
STEP 7: Add another coat of nail polish if the first didn’t cover it nicely. You can also add details with other colors. Create depth by adding a darker tone at the bottom and a lighter one at the tips. Leave them to dry (the second layer dries slower, so set it aside for about half an hour)!
STEP 8: Push the first petal gently together and wrap the others around it. Twist the two endings together. Wrap the second row around them. Repeat with the third layer of petals.
STEP 9: Gently bend or shape the petals for a more natural look.
STEP 10: Voila! You have a stunning mini rose.
Watch the video tutorial for more info!
How to fix torn petals
The #1 mistake you can make is not leaving the petals to dry completely. I admit I’m guilty of being inpatient and poking out or tearing petals because of it.
However, good news, they can be fixed!
If the hole is small, create another layer on the back of the petal.
Did you manage to make a big split? No worries! I do it all the time too!
Scrape off the excess and clear the wire as well as you can. Then recreate the layers.
How to make unique petal templates and tools
If you plan to make lots of nail polish flowers for jewelry, accessories, decoration, or to sell you may want to make the process faster.
A simple hack to ease your work and speed up the creation process is using templates.
You can easily create templates for the petals.
Tape together a pencil and a barbeque stick to create teardrop petals. It’s perfect to create, for example, lilies.

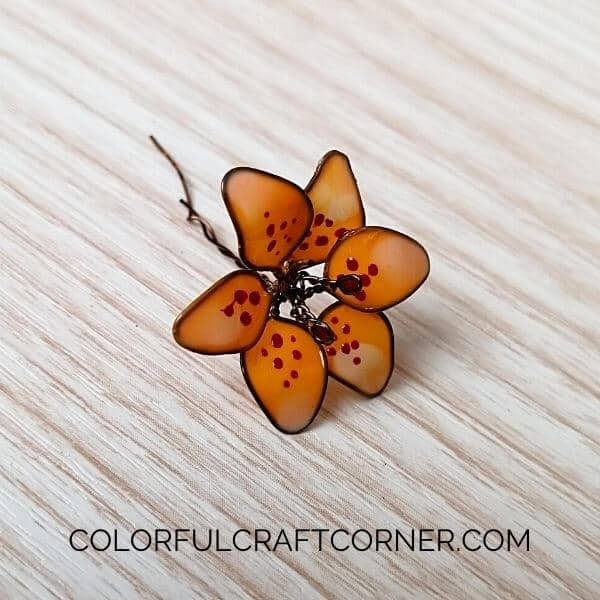
I made this bright yellow flower with this super simple technique. I created the anthers the same way I make the petals but made them super small.
I left the endings longer, and thread them through the center. Then I twisted them together to create the stem and to fasten them to the petals.
One of the best materials to make unique templates is air dry clay. Shape it, wait for it to dry, then use it! Make it long enough so you can easily wrap the wire around it.
You will save a ton of time because you don’t have to shape the petals individually.
Nail polish flower uses
Nail polish flowers are very versatile. YOu can use them for a lot of crafts. Here are just a few examples:
- Turn them into jewelry: earrings, necklaces, or glue them on a ring base.
- Embellish your bobby pins or twist lots of nail polish flowers into a spring crown.
- Make them with a longer stem and display them in a mini vase or terracotta pot.
- Decorate gift boxes or other gift wrappings.
Tips and Hacks
It’s not hard to make stunning flowers with wire and nail polish. With these hacks, you can make them easier and avoid mistakes.
- New nail polish works best, old ones have a thicker consistency and you’ll have a hard time creating the film on the petals.
- Load the brush with nail polish, but be careful, too much nail polish will drag and tear the film, not enough nail polish won’t cover the layer.
- Make them look more real by giving depth with different nail polish tones (darker at the bottom, lighter at the tips).
- You can shape the petals after the nail polish has dried. Push them gently.
- If you want to make them bigger, you can dip the flowers in glue to create the first layer and color them with nail polish after the glue dried.
For more tips and hacks you can also check out my wire and nail polish dragonfly tutorial. The link is below.
Related Wire and Nail Polish Crafts
DIY Dragonfly out of Wire and Nail Polis
Easy Chic Mini Wreath Tutorial
Final thoughts about the wire and nail polish flowers
Creating nail polish flowers is easy and cheap. This is the time to use your pile of nail polish you don’t really use.
I’m sure almost every woman has a bunch of them that they eventually throw in the trash.
So this is the time to make them shine! Try this super simple craft and create beautiful Spring decor or jewelry.
Have you ever tried nail polish crafts? Which flower was your favorite?
Leave a comment!

Literally how do you make the rose look like an actual rose? I’ve been trying this for days and after going through almost an entire spool of wire, I can’t get it shaped right. After putting together the entire flower, there is so much excess wire, so many torn petals, it looks like a hot mess. You are clearly very gifted!
Thanks, Jess 🙂 Can’t you make the rose look natural or the petals? You can send me an email if you want so I can help you 🙂
Hello!
The idea is really good, I tried to do it with nail polish, it really doesn’t work, do you need a special nail polish for this?
Or a certain type?
Hi! No, I used regular nail polish. It may be tricky and need some practice sometimes especially if you make the petals big.