How to make an earring holder out of shrink plastic
This blog post will show you how to make an easy, beautiful hanging moon earring holder. I’ve been planning a crescent moon decor for some time, and I finally came up with this decorative and functional idea.
DISCLOSURE: THIS POST MAY CONTAIN AFFILIATE LINKS, MEANING I GET A COMMISSION IF YOU DECIDE TO MAKE A PURCHASE THROUGH MY LINKS, AT NO COST TO YOU. PLEASE READ MY DISCLOSURE FOR MORE INFO.
This is the first time I have used shrink plastic. To be honest, I heard about shrinky a month or two ago. I was quite surprised that it’s available in several online craft stores (many craft materials used in the US or UK are not available in my country), and I instantly knew I had to try it.
I bought a package with three black and three white sheets and one transparent. First, I was thinking of making ornaments (I will also make Christmas ornaments if you’re interested, stay tuned), but I’ve seen this ceramic sun and moon earring holder on Etsy. I liked it and thought I could apply the idea to shrink plastic.
Eventually, I stayed with the hanging earring holder idea, since I am a total newbie with this craft material, I was afraid I would ruin it. I loved my new design, and also I was able to make the earring holder bigger (with the standing earring holder, I could only use one sheet).
I was super excited and stressed when I inserted the pieces into the oven, but they turned out fantastic.
I hope you also like my black and white hanging moon earring holder.
Now, let’s dive into the creation!

Tools and supplies
- shrink plastic (two A4 black sheets and one small transparent piece),
- white permanent marker,
- x-acto knife (craft knife),
- cutting mat,
- scissor,
- whole puncher (I used a leather puncher),
- jump rings,
- chain, thread, or something for hanging,
- sandpaper,
- template,
- pencil,
- baking paper,
- oven,
- plier.
Measurements
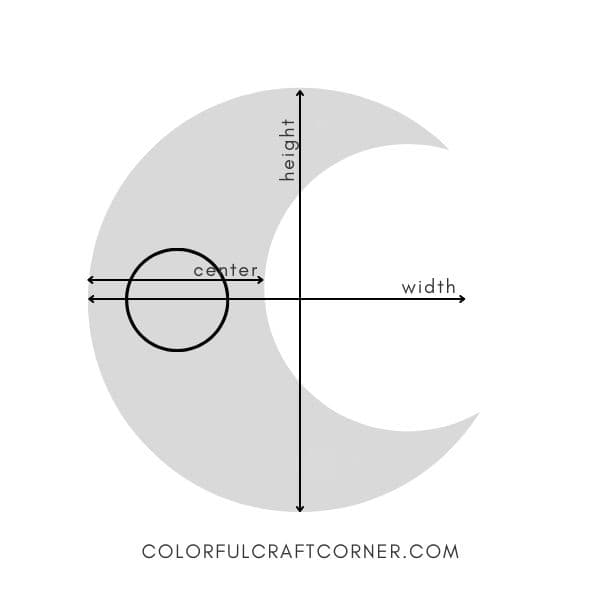
I was super curious about how big will it be after baking, so here are the measurements:
| Initial size | After baking | |
| Height | 33 cm (~13″) | 15.5 cm (~6.10″) |
| Width | 29 cm (~11.40″) | 13 cm (~5.10″) |
| Center | 14 cm (~5.51″) | 6.5 cm (~2.60″) |
NOTE: Yours may be bigger or smaller based on the shrink plastic you use, they may shrink 40-60%.
Step-by-step instructions
Preparation
Print out the template and cut out the pieces.

Creation
The center
First, I create the centerpiece. Sand the transparent sheet. Insert the lotus template below the sheet and secure it on the table. Trace the outline with the marker. Be careful not to smudge the lines. Decorate as you like. I added a few dots and lines for a more intricate design.
The sanding gave a nice matt finish, it looks almost like ice.

The Moon
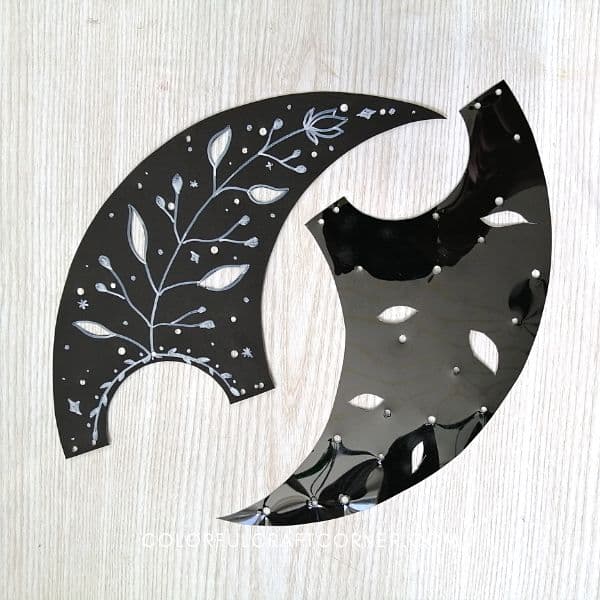
1. Lightly trace the half-moon shape on both black shrink plastic sheets (Don’t forget to flip it for the bottom part).
2. Draw the design. I picked a simple center branch across the moon, ended in a lotus bud, and decorated it with a few leaves and small berries. I filled the empty parts with dots and tiny stars to create a magical look. Don’t go overboard because you will also need space for the holes. To emphasize the white lotus, draw an ‘outline branch’ around the half-circle edge.

3. Now, let’s do the cut-outs. Put the decorated piece on a cutting mat. Carefully cut out the leaves with a precision knife. The plastic was thick, so I had to flip it and cut it on both sides.
Carefully pop out the leaves. Make sure you cut them all the way through to avoid serrated outlines, cracks, or breakage.
TIP: Before cutting, I inserted a new blade into my craft knife for nice and clean lines.
4. Repeat on the bottom part.

5. Cut out the center circle and both half-moon shapes. Use sharp scissors!

6. Add some holes using a hole puncher. I used a leather puncher and used two different sizes. Punch holes where parts meet, I put one in the center for the lotus insert and 2-2 for the main pieces, and one or two at the top so you can hang it.
6. Bake it according to the package. I put mine on baking paper in the oven at 150 degrees Celsius for 3-5 minutes (until they were flat again). Let them cool before assembling.
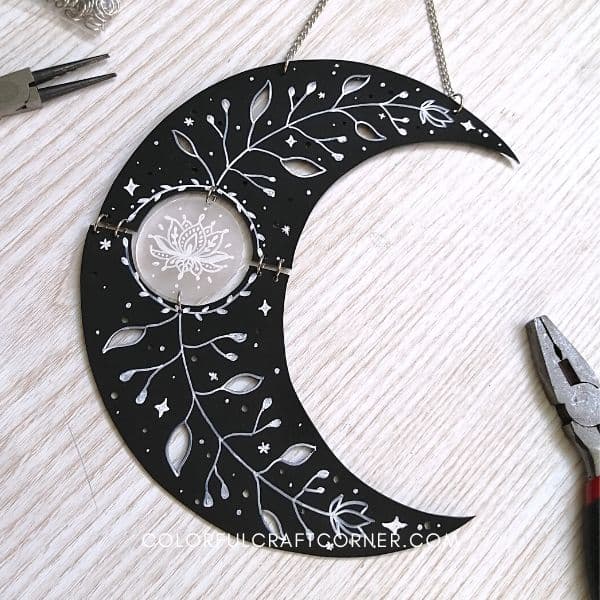
Assembling
Connect all the elements with jump rings. Insert one or two on the top for the thread or chain. I used a silver chain that matched my jump rings.
NOTE: Experiment with the placement, I moved the ring and chain three times until I was satisfied with the look of my hanging moon.
Video tutorial
Watch me make my DIY moon earring holder. It’s not visible on the video because I sped it up a little bit, I was so excited that my hands shook several times.
Tips and hacks
- Punch more holes around the bottom, and add eye pins or small hooks to hang thin bracelets and necklaces.
- Even though shrink plastic sheets bend, they are rigid and tend to break when forced. Always pick sharp scissors and take your time cutting narrow, pointy, and difficult parts.
- This earring holder looks quite durable, but it’s not an earring organizer, it’s more for displaying your favorite pieces. I wouldn’t recommend large and heavy statement earrings. It’s perfect for displaying stud earrings, small dangle earrings, or hoop earrings.
- Do you like those gorgeous moon drawings with mandala designs, chains, beads, and crystals? (See this example) This template is perfect for it too. You only need to plan out the holes to hang the chains and other decorative elements. I may do a tutorial on it too.
Final thoughts about the wall earring holder
I love how my moon earring display turned out. This is one of my all-time favorite projects, and I think I also have a new favorite craft material. You can expect more shrink plastic crafts soon.
I have a few exciting ideas, for example, earrings, bracelets, ornaments, and some shrink plastic scrap ideas. no one should waste this fantastic stuff!
I hope you liked this easy and fast earring holder idea! What would you like to see made out of shrink plastic? Leave a comment!
