
Simple DIY hanging Angel Ornament
In this post, I will show how to make beautiful DIY angel ornaments out of clay. I used air dry clay, but you can also make the wings with polymer clay using the same technique (except the final sanding).
I had lots of craft tutorials in my mind for this Christmas. This angel ornament wasn’t one of them, but I’ve stumbled upon this stunning African angel ornament made with banana leaves and sisal. I had to make my own hanging angel ornament!
I never was a fan of angel ornaments. I don’t know why I just loved globes, snowflakes, and star ornaments more. So, I was curious why were they so popular.
According to the dictionary, angel means:
” An angel is a messenger of God, characterized as having human form with wings and a halo. […] The word angel derives from the Greek angelos, meaning “messenger”. It is used in the Bible to denote God’s attendants, with angels often depicted as being of humans, an idea found in ancient Asian cultures as well”
(Source)
An angel ornament symbolizes that you’re asking for God’s guidance in your home.
This angel craft is so easy! You can try and make it with your kids too!
Now, let’s dive in!
DISCLOSURE: THIS POST MAY CONTAIN AFFILIATE LINKS, MEANING I GET A COMMISSION IF YOU DECIDE TO MAKE A PURCHASE THROUGH MY LINKS, AT NO COST TO YOU. PLEASE READ MY DISCLOSURE FOR MORE INFO.
Tools and supplies
- air dry clay,
- rolling pin,
- craft knife,
- soft pastel,
- template,
- plastic sheet,
- thin marker,
- scissor,
- thread,
- jewelry wire,
- plyer,
- glue,
- sandpaper (optional).
Air dry clay angel instructions
I split the process into two phases, creating the wings/base and the dress. I know many like angel wing ornaments. I will include in the template sheet a second variable, without the head, so you can create beautiful angel wing ornaments.
How to make the clay angel wings

1. Draw or print out the angel wing template.
2. Transfer the design to the plastic sheet (mylar sheets are perfect) with a thin marker.
3. Cut out the feathers using the craft knife.

4. Knead and roll out a piece of air drying clay to approx. a quarter inch thickness. Leave it thicker where the head will go.
5. Slightly wet the clay by dipping your finger in water and rubbing it in a circular motion.
6. Lay the wing ‘stencil’ on the clay and carefully push it, so it will stick to the surface.
7. Carefully push the plastic sheet around the cutouts with the tip of your craft knife.
8. Rub the soft pastel on your finger and transfer the pigments onto the feathers.
9. Remove the stencil.
10. Use the template to cut out the angel base.
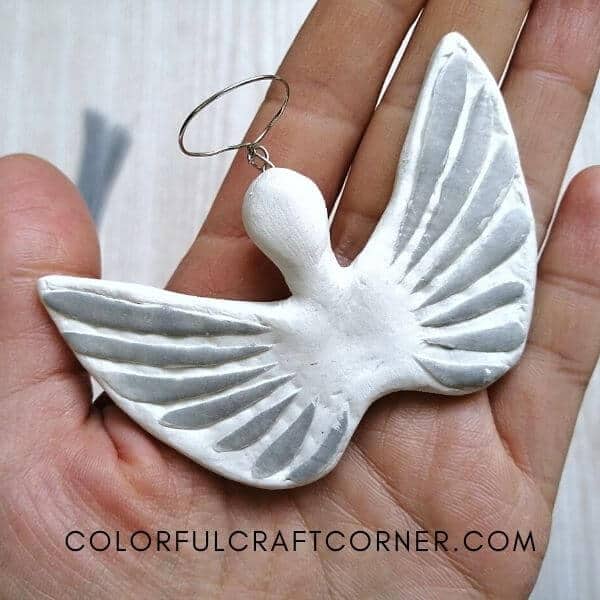
11. Shape the head and smooth out the edges with wet fingers.
12. Create the halo and a hanging hook with the jewelry wire.
13. Push the accessories in the head (you will remove, and stick them back in with glue when it has dried).
14. Wait for it to dry (approx. 24 hours).
15. Sand it if needed.
16. Remove the hook and the halo, apply some glue to the ending and place them back in.
17. Apply a coat of water-based varnish to seal and protect your ornament. I used one with a matte finish.
How to make the angel dress
I used regular sewing thread because I wanted a really flowy, elegant dress. Sewing thread also has a subtle shine which was perfect for the dress. However, you can use any other yarn or thread you want to (for example, with metallic threads you could make stunning dresses).
1. Wrap the thread around a notebook. I wrapped 2 x 100 times.
2. Cut at the bottom.
3. Add one-one strand on each shoulder.
4. Cut a piece of thread, fold it in half and tie the strands together under the wings. Wrap it around a couple of times to create the waist.
5. Comb and trim the bottom of the skirt.
Angel ornament video tutorial
Tips and hacks
- It’s always best to create the air dry clay pieces in one. Cut and sculpt the head together with the wings, don’t attach it separately.
- You can add thread hair using doll hair making techniques.
- If you want to, paint the wings or face using acrylic paint.
- Dress alternative: pick a lace ribbon, fold it in half, cut a hole for the head, and tie it at a waist for a lace dress. (See image below)
Final thoughts about the DIY angel ornament
If you like hanging angel ornaments this clay craft is super easy and cheap. You can use them as Christmas tree ornaments or hanging decoration for your home. They also make a perfect gift for your loved ones!
I hope you liked this DIY angel ornament. Have you ever made air dry clay ornaments? Leave a comment!
Other DIY Christmas Decor Tutorials:
- Is DAS air drying clay good?
- Heart Ornament Made with Pinecones
- Chic Mini Wreath Ornaments with Wire and Nail Polish
- Cute Mini Gnome Decoration
- Air Dry Clay Gnome Pot – Christmas Tree Alternative

How do I get the wing template?
If you click on the big green button “Download the template” under the section Tools and Supplies, the template will appear in a new tab. You can print it or download it from there. Please let me know if you still can’t access it 🙂