
How to make a simple Christmas tree topper
In this post, I’ll show you how to make an easy and cheap DIY star Christmas tree topper that you can make in half an hour. This craft is so simple, yet the result looks amazing! These beautiful clothespin stars are also perfect as Christmas tree ornaments.
I’ve been struggling to find a beautiful Christmas tree topper for years! All the stores sell the same lousy plastic stars year after year.
Last year, I’ve found the clothespin snowflake ornaments. I had a couple of wood clothespins at home, so I turned them into ornaments.
Last week, I bought another batch to make some more this year. I searched for new designs when I’ve found this cool tutorial. When I spotted the star-like version, I knew I will make a tree topper with clothespins.
I rearranged them several times. This final version is the one I like the most. The best part is that you can paint and customize it to match your style and the ornaments you already have.
Now, let’s start crafting!
DISCLOSURE: THIS POST MAY CONTAIN AFFILIATE LINKS, MEANING I GET A COMMISSION IF YOU DECIDE TO MAKE A PURCHASE THROUGH MY LINKS, AT NO COST TO YOU. PLEASE READ MY DISCLOSURE FOR MORE INFO.
Tools and supplies
- 10 wooden clothespins,
- hot glue or wooden glue,
- green florist wire (stronger),
- styrofoam cone (other cone-shaped objects are also perfect),
- acrylic paint (optional),
- craft glue (optional),
- glitter (optional).

Star tree topper instructions
Step 1 – Wrap a piece of florist wire around the cone in a loose spring. Leave at the top, an approx 1-inch piece, flat.
Step 2 – Separate the wooden clothespins and throw away the wire springs (or keep them for other crafts).
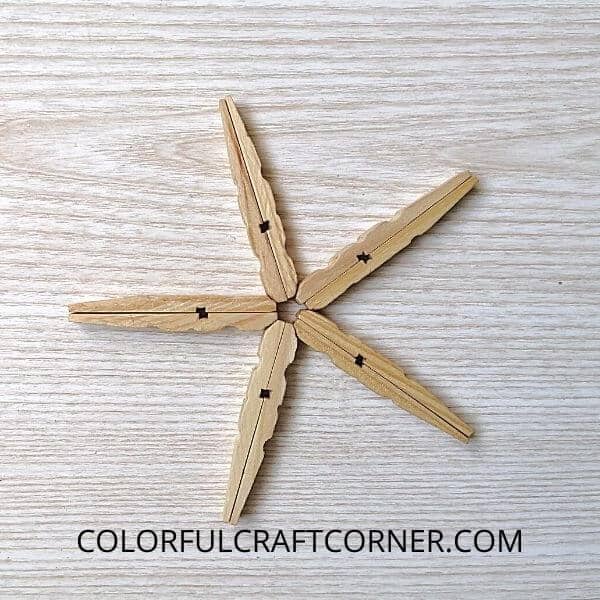
Step 3 – Flip the two halves and glue the longer, outer sides together with hot glue or wood glue. Repeat until you have four pieces. When making the fifth element, insert the wire between after you’ve added the glue.

Step 4 – Arrange them in a star-like shape. Try to make it as symmetric as possible. Use a print-out star for guidance if needed.
Step 5 – Glue them where they touch in the middle. Test the bonds. Fix, or add more glue, where they are loose.
Step 6 – Grab two pieces and join the oblique sides to form a roof-like shape. Add some glue and press them together. Repeat with the remaining pegs.

Step 7 – Arrange them around the middle star. Make sure they are aligned and centered before gluing them.
Step 8 – Add a dot of glue at each tip and carefully press and align them.

Step 9 – Paint it with acrylic paint, or spray paint (this may be a lot faster but I didn’t have one at home).
Step 10 – Apply a thin coat of craft glue on the outer star, and sprinkle it with glitter. Leave it to dry.
Step 11 – Enjoy your stunning new star tree topper!

Video Tutorial
Homemade tree topper tips and hacks
- Pick quailty wood pegs, it makes a difference! The ones I had at home were clumsy. They were harder to arrange, glue and paint nicely.
- Add rhinestones, pearls, or other decorative elements to match your style.
- If you want to leave them natural, I would recommend using wood glue that dries clear for best results. When you use hot glue, the paint covers the imperfections, but for the natural version you want the glue to stay unnoticed.
Final thoughts about the homemade Christmas tree topper
This is such an easy Christmas craft that every beginner could do it. You can make it in 30 minutes or less and it looks amazing! It’s almost fail-proof.
They would also make perfect Christmas tree ornaments, gifts for your loved ones, or hang them above your dining table to create a magical vibe for your Christmas dinner.
Have you ever used clothespins for making crafts? Leave a comment!
Other Christmas tree decorations:
- Pinecone Heart Ornament,
- Pretty Wire and Nail Polish Mini Wreaths,
- Cheap Cardboard Tube Snowflake Ornaments.
