
How to make a non-edible gingerbread house
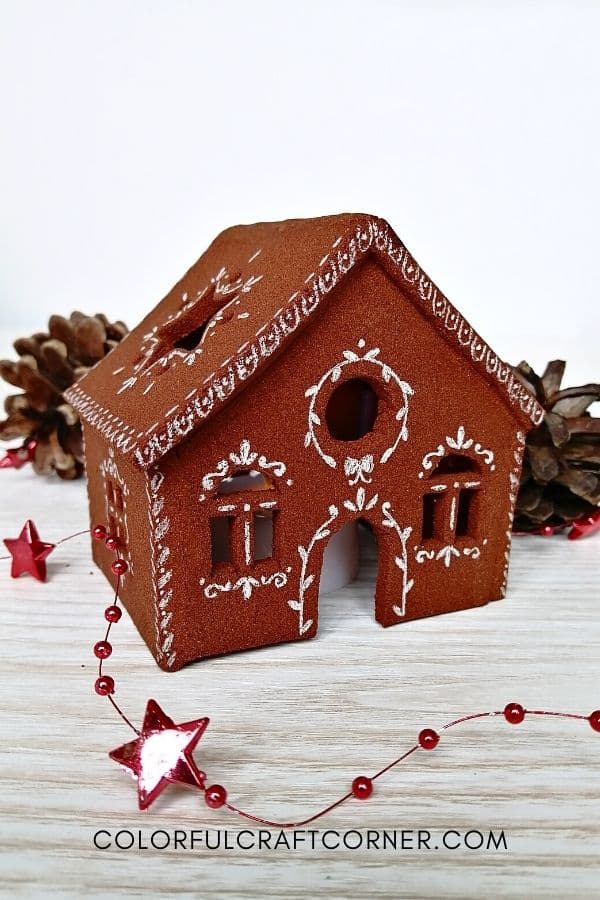
In this post, I will show you how to make a DIY non-edible gingerbread house that smells amazing and looks truly beautiful! This easy gingerbread house alternative looks almost like real gingerbread. Try it with your kids and enjoy this gingerbread house luminary for years!
I love gingerbread, I make a few batches every year, but I made a gingerbread house only once. Why? After all that work, I couldn’t eat them.
A couple of years ago I stumbled upon the cinnamon dough ornaments on Pinterest. I made some snowflake ornaments and loved it, the look, the scent, everything! So, the next year I’ve decided to make a DIY gingerbread house, that I can keep for years.
It didn’t turn out as expected. I couldn’t hide the joints, the glue peeked and looked ugly. I was disappointed and didn’t like the overall messy look.
The second attempt was slightly better but still not pretty enough.
This year, I found a tutorial on Pinterest, with a new technique on how to make an air dry clay house. It struck me! I could use this method to make a pretty gingerbread house!
So, here we are! I’m very pleased with how my cute gingerbread house luminary turned out. You can make it bigger too, just read my tips and hacks sections for best results.
DISCLOSURE: THIS POST MAY CONTAIN AFFILIATE LINKS, MEANING I GET A COMMISSION IF YOU DECIDE TO MAKE A PURCHASE THROUGH MY LINKS, AT NO COST TO YOU. PLEASE READ MY DISCLOSURE FOR MORE INFO.
Tools and supplies
- cinnamond dough (ground cinnamon and applesauce),
- house template or gingerbread house cookie cutters,
- scissor,
- craft knife set (with flat blades),
- small round and star cookie cutter,
- plastic straw (two sizes, small and regular),
- plastic wrap,
- rolling pin (+ guide rings),
- hot glue,
- white gel pen.
Non-edible gingerbread house instructions
Step 1 – Make a batch of cinnamon dough (recipe Completely Delicious). I used the leftover dough from my scented gnome.
NOTE! If your dough is too soft mix in more cinnamon. You want it to be easy to roll out, but also you should be able to easily remove it from your working surface. It should have an air dry clay-like consistency.
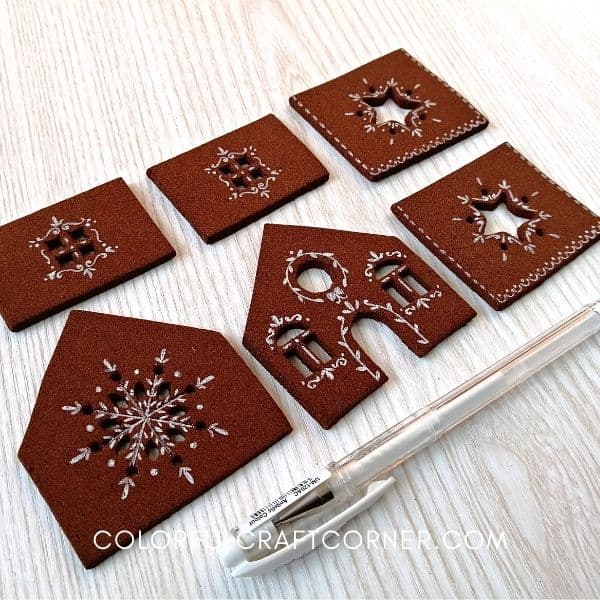
Step 2 – Cut out the gingerbread house templates. A faster option is using a set of gingerbread house cookie cutters. (I don’t have one, and wanted to make my unique design.)
You can use my design. Click the link below for the printable template.
Step 3 – Roll out the dough. I used rolling pin guide rings so I can achieve a consistent thickness all over the house. This is important for stability, durability, and also for aesthetics.
Step 4 – Cut around the templates using a craft knife.
Step 5 – Cut out the windows and make the decorative cut-outs with the plastic straws, the star, and circle dough cutters. I also used a piece of cardboard to shape the snowflake on the back of the house.
Step 6 – Leave the pieces to dry for at least 24-48 hours. Occasionally turn them so every side can fully dry.

IMPORTANT! Make sure you set aside a piece of cinnamon dough so you can patch up the joints after you glue the luminary together.
Step 7 – Decorate the pieces using a white gel pen. If you make it bigger you can also use a white marker or acrylic paint for thicker lines.
Step 8 – Glue the pieces together using hot glue. Try to make it as clean as possible with minimal glue on the outer layers. You can strengthen the joints by adding a stripe of glue on the inside.
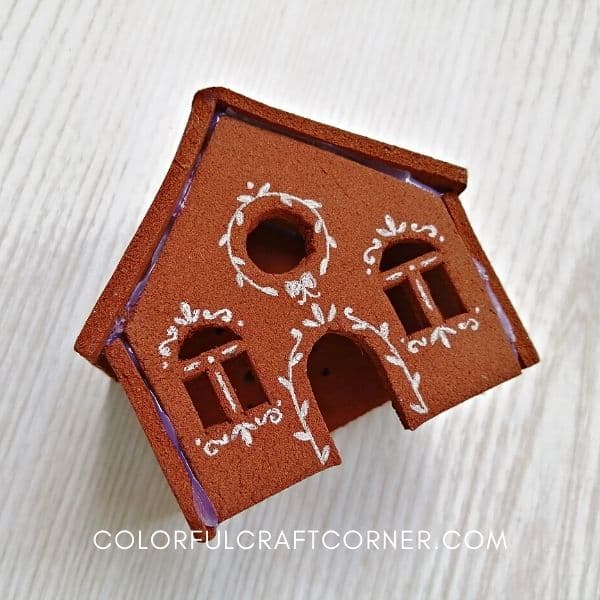
Step 9 – Slightly wet your fingers and soften up a small piece of cinnamon dough. Push it into the gaps and smooth it out with your fingers or a craft knife.
TIP! Don’t add too much water, because the dough will become slimy and also dries to a lighter brown color than the original one.

Step 10 – Leave it to dry for a couple of hours. It will dry a lot faster.
Step 11 – You can further decorate the house. I added some delicate patterns on the edges.
Step 10 – Enjoy your stunning, scented, gingerbread house craft!
Video tutorial
Tips and hacks
- NEVER use your gingerbread house luminary with real candles! Opt for led operated candles.
- If you want to make them bigger (mine is 7.5-8 cm = approx. 3 inches tall and wide), roll the dough out to at least a quarter of an inch thickness. Thin walls make the house fragile.
- Make them look more like regular gingerbread houses using puffy paint, plastic candy charms or other Christmas charms.
- Some recipes state that you can bake/dry cinnamon dough in the oven. I never tried because I like to monitor them while drying, turning them regularly so they won’t bend or curl up. This article by The Kitchn has instructions on how to bake cinnamon dough in the oven.
- Try to smooth out any rough edges or imperfections while the dough is still wet, because you won’t be able fix them after they have dried. (You can sand it, but their surface will fade. It’ll look ugly!)

Final thoughts about the gingerbread house craft
This is a simple and beautiful Christmas craft that you can make alone or together with your kids or partner. You can use it with a candle as a Christmas luminary or on its own as a gingerbread house alternative that you make once and enjoy for years.
The best part about this DIY gingerbread house is that it smells amazing and keeps its scent for years. The room where you display it will smell cinnamon and if you want you can add a few drops of orange essential oil on the inside walls.
Have you ever made cinnamon dough for ornaments? Leave a comment!
Other DIY Christmas decorations:
- Scented Gnome Decor
- Pinecone Heart Ornament
- Mini Wreath Ornament
- Simple Star Christmas Tree Topper
- Snowflake Candle Holder out of Clay
- Air Dry Clay Hanging Angle

This gingerbread house is gorgeous. Thank you.
Thank you! I’m so happy you like it 🙂
Love this idea! I tried to make just the front of houses for a mantle but really big. About 12 inches tall and 6 inches wide. I tried both baking and air drying but they are all got cracks as they dried. Is there a trick to not getting cracks?
To be honest, my cinnamon dough decorations never cracked. I once made an 8-9 inch tall gingerbread house but made the was thicker, around a quarter of an inch. However, I noticed that if the dough is not wet enough it won’t dry nice and smooth, and seems weaker. Was your dough wet enough? You may also try and add in glue (that dries clear). Also, an armature may help to make it sturdier. For example, you could incorporate a plastic net, or wire into the walls. I hope this helps you!