
Felt embroidered bookmark craft
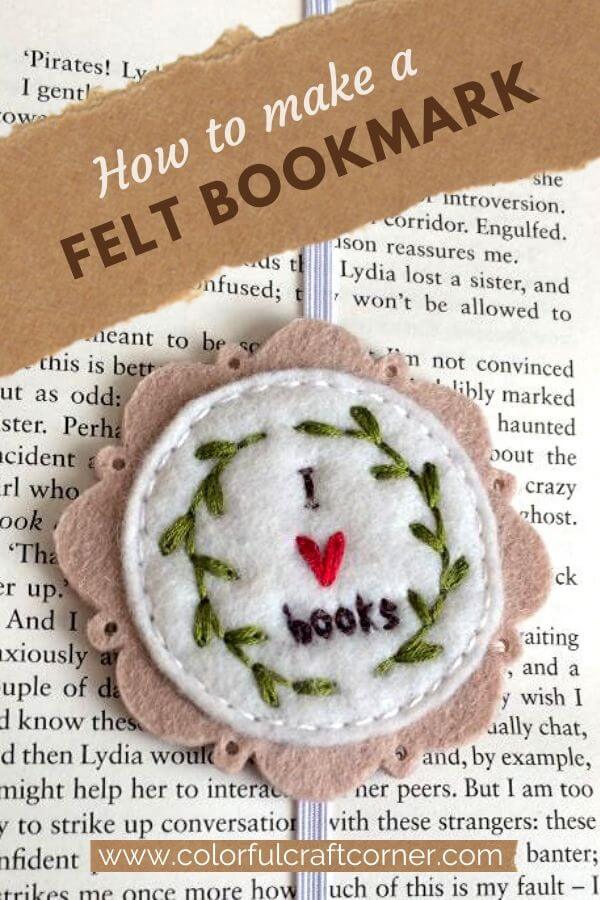
In this post, I will show you how to make an easy and beautiful felt bookmark. You can finish this project in a couple of hours (if you are a beginner) or faster if you’re a skillful crafter.
With a few supplies and some free time, you can make a unique bookmark. You can either keep it to yourself or give it as a gift for a loved one, perfect for Mother’s day, teacher appreciation gift, and for book lovers.
What inspired this felt embroidered bookmark
About 4-5 years ago, I discovered how fun it is to make crafts with felt. I mostly made small stuff, earring, necklaces, phone cases. One day I stumbled upon a pin on Pinterest with an embroidered felt bookmark. I kept hunting for other felt embroidery ideas, and I’ve found several stunning felt embroideries. That was the day when I fell in love with embroidery on felt crafts.
Felt crafts are cheap, durable, and effortless to make. Felt is versatile; you can make so much more than kids crafts.
Now, back to our project. Before jumping in, you will have to gather a couple of tools and supplies.

Tools and supplies for the felt wreath bookmark:
- felt: I used stiff skin colored felt and soft, natural wool colored felt,
- needle,
- embroidery thread: white pearl embroidery thread, moss green, bright red, and chocolate brown cotton embroidery floss,
- leather hole punch tool,
- narrow, flat, white elastic band,
- glue gun + glue,
- templates.
Let’s get to work.
#1 Cut out the felt shapes
Download the free templates and print them out. You can print it on paper, cut it, and track the forms on felt with a pen. If you have freezer paper at-home, use that to transfer the pattern (print, cut, and iron it). Or another method is using Sulky Sticky Fabry Solvy.
With the freezer paper and the Fabry Solvy technique, you can also transfer the embroidery design. If you want to know more about adding patterns to felt, check out this post on how to craft with felt.

#2 Get the pieces ready
Adjust your hole puncher to the smallest size. Punch holes with the leather hole puncher on the lace-like middle part. If you don’t have a hole puncher you can leave it as it is, the bookmark will look fantastic either way. Or try to cut small holes with a pointy, sharp, smaller sized scissor.
Measure the width of the elastic and cut the desired length.
Cut two parallel lines in the middle of one of the circles. This circle will be the back of the bookmark. This circle will cover the embroidery ravel and where you join the ends of the elastic.
#3 Start sewing
For this felt bookmark, you have to use two basic stitches: backstitch and the lazy daisy stitch.
If you’ve never done embroidery, or just looking for a recap, watch this video on how to make the basic embroidery stitches.
Start sewing with the other circle (front). Attach it on the tan-colored, lace-like part and sew it around with the white pearl embroidery thread, using the back stitch.
#4 Embroidering the design
Start embroidering with the wreath. Stitch the base with the backstitch and add leaves with the lazy daisy stitch.
Make the heart shape with two lazy daisy stitches (they start from the same hole).
When you’re done, sew the words with the backstitch.
If you’re using Fabry Solvy, swap step #3 with #4. Do the embroidery first, and sew them together afterward. If you’re a beginner using Fabry Solvy will make everything easier.
If you’re a more experienced in crafting, but you don’t want to mess it up, draw the embroidery design on the felt and track it while stitching.

#5 Assemble the elastic
Measure an averaged or smaller-sized book, double it and add an extra 1-1 1/2 inch for sewing. I used 3.5 inches sized book, so I’ve cut 3.5″ x2 + 1 1/2″ = 8 1/2 inch elastic.
Get the back of the bookmark, and thread in the elastic where you made the openings. Sew the ends together.
#6 Finish the bookmark
Now you have only one thing to do, glue the back with the elastic on the embroidered part. Make sure that the sewed part faces inwards and covers all the stitched back.
Tips and hacks:
- try decorative elastic bands (I didn’t have one at the time, but these printed elastics look so much fun),
- customize the embroidery (for example for Mother’s day – ‘I love MOM’),
- decorate the bookmark with beads, sequins, ribbons,
- experiment with other color combinations.
Did you like this felt bookmark? I have a vast list of other felt crafts for inspiration. Check it out here.
If you fell in love with embroidered bookmarks, like I did in the past, check out this post on felt embroidered bookmarks by Flamingo Toe’s.
Do you like this felt wreath bookmark? Do you know someone who would appreciate it as a gift?
Leave a comment.
Related posts:
- The Best Felt Flowers Tutorials and Patterns
- The Best Felt Craft Ideas – The Ultimate List
- How to Craft with Felt – The Ultimate Guide (2020)
- DIY Felt Lion Wall Art
- Christmas Felt Applique and Needle Felt Craft Kits
DIY Felt Embroidered Bookmark
Loved the tutorial. So many adds I nearly gave up getting to the though .