
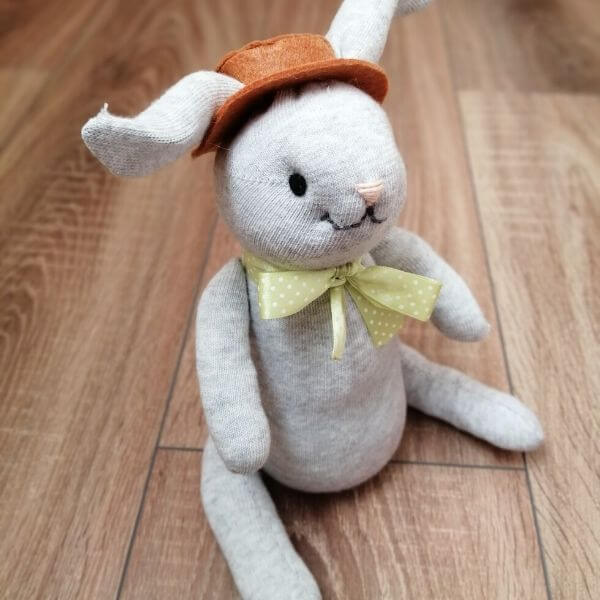
Easy step-by-step tutorial on how to create a bunny out of socks.
In this post, you will learn how to make an adorable sock bunny. This rabbit is perfect as an Easter decoration, especially if you have kids at home, but also a plushie for your children.
When I was a child, we didn’t really decorate our house for the holidays. We had a tree and maybe an advent wreath for Christmas and a couple of dyed eggs and willow catkins for Easter, but nothing more.
Since we have our own family and house, I’ve decided to add more seasonal decor. I know that my son is too little (11 months old) to appreciate it, but I want to create new family traditions, and that takes time. And also, I want to make these decorations myself, and with a baby on board, I can’t do a lot at a time, so hopefully, they will add up throughout the years.
Easter is around the corner, and I am so happy that Spring is finally here. I wanted to make a sock reindeer for Christmas, but with all the guests and cleaning the house, I didn’t have the time. I decided that I will make a sock bunny for Easter.
This tutorial is easy and requires only a few supplies and an afternoon to make it. I also included the pattern for the legs and for the hat (you can download it from my free resource library). Still, you can also experiment with other shapes.
Let’s start making this DIY sock bunny!
What supplies do you need for the sock bunny:
- a pair of crew length socks,
- matching sewing thread,
- embroidery thread (pink for the nose, dark grey (or other) for the mouth, camel brown for the hat),
- needles (one thinner for sewing and one for the nose and mouth embroidery),
- felt (I used hazelnut brown for the cap and a small piece of black for the eyes),
- colorful ribbon,
- toy or pillow stuffing,
- rice (approx. 1 cup),
- wire,
- white pom-pom,
- scissors,
- glue gun.
Let’s get to crafting.
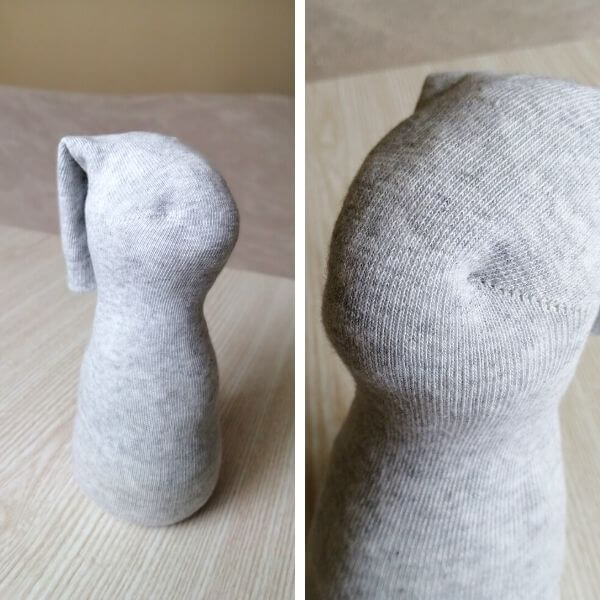
How to make the rabbit’s body and head?
Pour the rice in the sock, you can use a spoon or a cone for that. The rice is a bit heavy, so the bunny won’t overbalance.
Now start stuffing the body. Do not use big chunks while filling the stocking. Separate the fibers into tufts and work gradually.
The knit material makes it easy to shape the body and the head. Use your hand to sculpt it, as you would do with clay.
For the head, I rolled the fiber tufts in an egg-like shape and added more where needed. The head should be at the heel part of the sock.
Check out this helpful tutorial by Stitches n Scraps on how to create eye sockets.
How to add the nose and mouth embroidery?
To create the eye sockets, stitch through the head two times, lightly pull the thread and secure it. You don’t have to worry about the knots, the felt eye will cover it.
For the nose and mouth, pull the needle through the head. Create a V shape, then top it with parallel stitch lines.
Lightly draw on the face where you want the mouth to be. I used a backstitch to create the lines. Shape the corner of the mouth as you did with the eye sockets.

How to create the bunny ears?
I’ve decided to use wires in the ears because I wanted to be adjustable to be more adorable.
Cut the elastic part, and flatten the sock. Insert the wire, twisted in the shape of bunny ears, and close the head. Use running stitch around the head, pull the thread, and secure it with a knot.
Cut all the way down in the middle of the sock and round it to look like ears. Close the ears with an invisible stitch, before finishing, add a little stuffing in the ears.

In this excellent video, you can learn how to hand-sew the invisible stitch if you’re not familiar with it.
How to make the rabbit feet?
Turn the other sock inside-out, and using the templates, mark the feet. Stitch around your lines with backstitch, and cut them out. Fill the legs with stuffing and close the openings with the invisible stitch.

How to make the bunny’s hat?
Cut out the pieces and start stitching with the crease and the crown. I used a stiff, thick felt (~2mm). I sewed in an up and down motion with the running stitch. This way, only the crease will have visible stitches.

Sew on the brim. Don’t forget to leave two openings for the bunny ears (~1″). You can also try to glue the parts together.
How to finish the rabbit craft?
You can fasten the feet, eyes (I used two oval black felt pieces), the hat, and the tail either by sewing or gluing. I chose to stick it because it’s faster, and I want to use this sock rabbit as Easter decoration and not as a toy for my son.
Although, if you want to give it to your child as a plushie, I would recommend sewing.
Bend the ears as you please, tie the ribbon into a cute bow and you’re done.

Other tips and hacks:
- If you don’t like to use food in crafts, exchange rice with glass or plastic pellets,
- Add other decoration to your rabbit: felt flowers, plastic egg, embroidery (with chain stitch embroidery the hat would look more like a straw hat),
- Make him a bunny girlfriend with a cute felt bow,
- If you want to use it as a plushie for your child, avoid using a glue gun and sew on the legs and hat,
- I used plastic toy stuffing, cotton, or wool stuffing are more children friendly for toys,
- Make a yarn pom-pom to create a fluffier tail,
- You can use a plastic doll’s eyes instead of black felt,
- If you like to sew, you can also sew him dungarees from leftover denim fabric.
Final thoughts on creating a sock bunny:
In conclusion, I love how this sock bunny craft turned out. It’s the most adorable DIY Easter decoration so far. I think it suits every home decor style and effortless to customize.
This is the type of decoration that the entire family would love from the small ones to the elderly.
Do you like this DIY rabbit? Would you like to see more sock animals in the future for decoration and toy purposes?
DIY Sock Rabbit Decor

where can i find the template for the sock bunny legs, arms and hat
Hi Diane,
So sorry, I don’t know how I missed it. I will add it to the Resource Library today!
The template is available in the Resource Library!
Thank you for sharing, I think it’s very cute and creative and easy to make !