
How to Paint Amazing Pumpkins (35+ ideas)
Do you always desire those stunning DIY creations on Pinterest, but your crafts always turn out a big mess?
Have you ever looked amazed and with envy at other people’s stunning pumpkin decor?
Do you ever dream about the perfect pumpkin for Fall?
In this post, I will guide you through how to paint the best pumpkin for Fall or Halloween?
Painting pumpkins is one of the most effortless and fun no-carve pumpkin crafts that you can also make with your children.
You may think that there’s no big deal about painted pumpkins, you just grab a bottle of paint and add a design, the end! But to achieve that ‘home decor magazine’ style gorgeous pumpkins you do need to know some hacks.
Do you know everything about painting pumpkins and came only for inspiration? Click to jump to the pumpkin painting ideas section.
Are you ready? Let’s dive in!
How to choose your pumpkins for painting?
You don’t need to be a pumpkin PRO to identify good pumpkins. For your craft, you do need and want to work with fresh pumpkins. Having a rotten art-piece after a couple of days is a big bummer, a waste of time, money, and energy.
There are a couple of things to look out for when choosing the ‘lucky one’. Search for fresh, firm pumpkins with hard skins. Soft spots and liquid leaking is a sign of rot. Avoid pumpkins with bruised, scratched, discolored, or damaged skin.
Always check the stem too; opt for a firm, and a few inches long. Small, loose or missing stems are a bad sign.
A foul odor is also an indication of rotten or overripe pumpkins (examine at the stem (top) and the blossom end (bottom).
What pumpkins are best for painting?
You may also wonder, is there a specific type that is best for painting or crafts in general?
According to wikiHow: most pumpkins are suitable for painting, but a few are especially good:
- Baby Pam,
- Sugar Pie,
- Neon,
- Lumina,
- Cotton Candy.
How to prepare pumpkins for painting?
If you are a crafter, you may already know that before painting anything, you need to prepare the surface so the paint has proper adherence.
Pumpkins have a glossy and non-porous surface, so the paint doesn’t have anything to adhere to. If the pumpkin is not primed, the color ultimately can rub off, crack, peel off, or wouldn’t stick or cover the surface well.
What you have to do?
- Clean the pumpkin gently with a damp cloth or wet wipes, then pat it dry. Avoid rubbing or brushing it vigorously that may damage the skin.
- Try not to wet the stem and the blossom end part, because it will make your pumpkin go bad faster.
- For better adhesion, use a craft sealant, acrylic ground, or gesso as a primer before painting. Although this step is optional, it may help the paint to stick to the surface. Add a light coat and let it dry completely before painting.
Also, be aware that over time your pumpkin may dry out and shrink and this will also affect your painting.
What kind of paint do you use on a pumpkin?
If only adults are involved in the painting process the best paint to use is acrylic paint (craft or artists acrylic paint) or spray paint.
I prefer using acrylic paint because they are available in a large variety of colors and also with different effects like metallic, pearl, or velvet. Everyone can find the best paint for their needs and style.
For a most distinct effect, you can also use chalkboard paint (you can write on the pumpkins notes, quotes, or draw fun things on it with chalk), or puff paint to create lace-like or henna tattoo designs.
Use permanent markers to add further patterns, doodles, or line art.
Painting pumpkins with kids is a little different. Never spray paint pumpkins with children around (it is toxic, and adults should also paint outside or in a well-ventilated room with masks). Even though most craft acrylic paints are non-toxic, I still wouldn’t use them with kids.
For kids, use washable paint or mix tempera with school glue to make it stick better (50/50 ratio). Activity paint is a good choice since it adheres to almost any surface and not prone to cracking.
How to paint pumpkins?
I wouldn’t say that there is a proper way to paint pumpkins except for the first and crucial step of preparing the pumpkin (see the benefits I’ve mentioned above in the article) and sealing after painting. Finishing your craft with a sealant will not only make them look better but also protect them from getting scratched or damaged.
But let’s see several methods of painting a pumpkin:
- painting a solid color with a brush or spray paint (tutorial by Practically Functional),
- hand-paint designs (tutorial by Craftberry Bush)
- ombre painting (tutorial by Sarah Hearts),
- drip painted (tutorial by Momdot),
- marbled effect (tutorial by A Bubbly Life),
- dip-painted (tutorial by Ciera Design),
- color splatters (tutorial by Homeyohmy),
- stenciled (tutorial by Handmade Charlotte).


What to use to decorate pumpkins?
There are endless craft supplies you can embellish your freshly painted pumpkin. I would recommend not overdoing it. Usually, less is more.
So let’s see how to further decorate painted pumpkins:
- pipe cleaners,
- yarn,
- stickers,
- raffia,
- washi tape,
- glitter,
- felt, craft foam, or leather shapes,
- googly eyes,
- buttons,
- add texture before painting with a hot glue gun or puff paint,
- sequins,
- make small cutouts or drill holes in it,
- wheat, hay, or berries,
- rhinestones,
- pom poms,
- beads,
- drip crayons with a hot glue gun,
- studs,
- lace, doily, or macrame,
- knit or crochet hats, scarfs or cozy,
- tattoos or mod podge paper napkins,
- newspapers or old books,
- ribbons (turn them into bats or decorate along the lines),
- jewels,
- tissue paper, construction paper, or craft paper,
- feathers,
- fabric scraps,
- mosaic or small mirrors (turn them into a disco ball),
- hats (for example, witch or straw hat),
- flowers (create a wreath around the stem).
Easy pumpkin painting ideas
Do you need inspiration? I’ve collected a few of my favorite painted pumpkin tutorials. I categorized them so you can easily find your winner for this year.
Creative pumpkin ideas:
- Sparkly mermaid by A Pumpkin and A Princess,
- Easy cactus variations by Aww Sam,
- Stunning flower moon by The Merrythought,
- Fun and colorful pipe cleaners by Design Improvised,
- Hillarious DIY Pun-Kins by Studio DIY,
- Chic watercolor and gold painting by Nest of Posies.

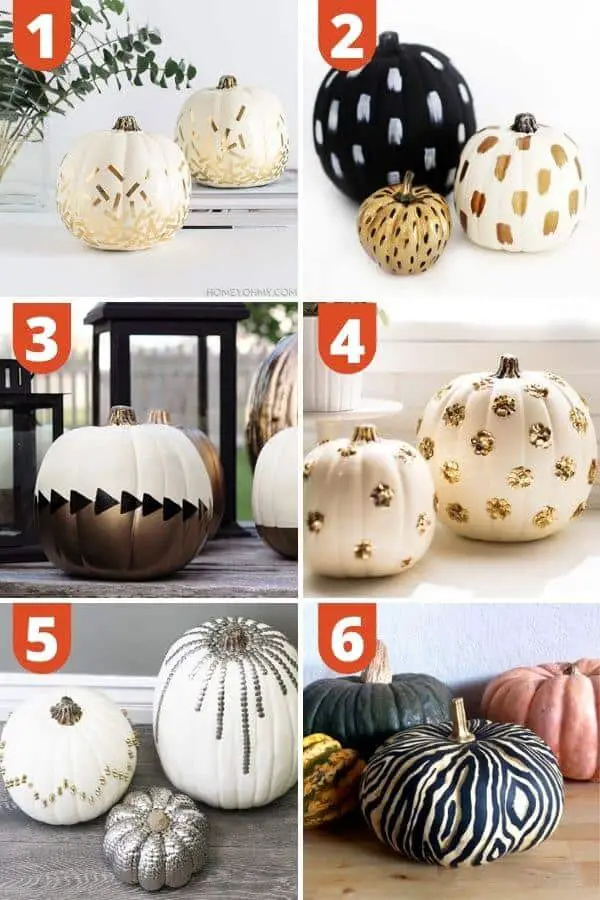
Chic and cool pumpkin painting ideas:
- Gorgeous gold confetti by Homeyohmy,
- Effortless brushstrokes by The Merrythought,
- Chic fall pumpkins by Bobby & Bean,
- Glamorous sequin polka dots by Sugar and Cloth,
- Cool studs by Jessie Daye,
- Woodgrain pattern by Vitamini Handmade.
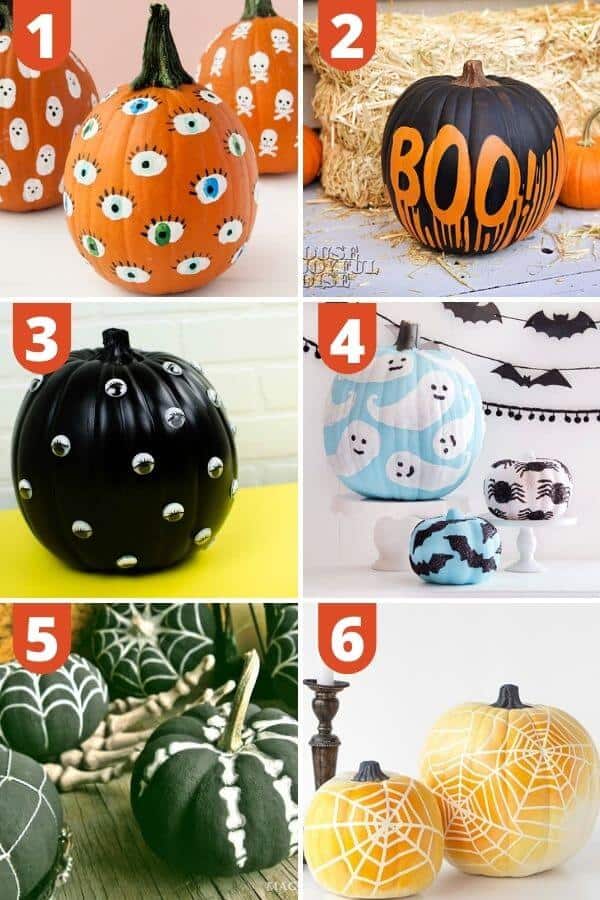
Spooky Halloween pumpkin painting ideas:
- Easily painted fingerprints by Handmade Charlotte,
- ‘Boo’ stenciled by House of Joyfulnoise,
- Scary googly eyes by A Little Craft in Your Day,
- Glittery Halloween by The Inspiration Board,
- Black and White variations by Magia Mia,
- Spider webs on ombre painting by Plaid Online.
Cute pumpkin painting ideas:
- Nom-nom donuts by Studio DIY,
- Fall foliage with flowers by PMQ for Two,
- Lovely Minions by Crafty Morning (I’m a Minions fan!),
- Adorable Unicorn with flower crown by Craft Box Girls,
- Yummy ice cream cone by Frugal Coupon Living,
- Cute woodland animals for the kids and not only by Lia Griffith.

How long will a painted pumpkin last
Usually, uncut pumpkins last – 3-6 months if they are stored in a cool, dry place. This may vary, because you never know exactly how fresh they are.
On the contrary, carved pumpkins last a couple of days before starting to rot (an estimate of 3-5 days). You can prolong the life of your carved pumpkin with a few tricks and hacks like putting it in the fridge for the night or using battery-operated candles or glow sticks.
For more tips, check this guide on how to make pumpkins last longer by Woman’s Day.
How do you preserve painted pumpkins?
The good news is that paint will help to preserve the pumpkin. Although, as I mentioned above, after painting, apply a coat of sealer, that will also help to keep out moisture and prevent your pumpkin from early rotting.
Do you want to learn more about how to preserve pumpkins? Head over to this guide by This Is My Garden. They cover both carved and painted pumpkins.
Bonus NO-Carve pumpkin ideas
- Stack pumpkins to create “fall people” or a witch. Draw them a face and decorate with hat, scarves, wheat, or anything else.
- Wrap the pumpkin with gauze for small and spooky mummies. Add night-glow googly eyes to make them even creepier.
- Paint a small pumpkin black. Attach pipe cleaners or wire on each side and glue on a few different sized googly eyes. Voila, you have an adorable pumpkin spider.
- Turn them into a large pillar candle holder by removing the stem.
Conclusion about painting pumpkins
As you could see, painting pumpkins is not rocket science, but if you follow the tips and hacks mentioned above, you’ll definitely create a stunning pumpkin decor that amaze the neighbours and will last for weeks.
I hope you found this article helpful, and I could also give you inspiration for a new and stunning Fall or Halloween pumpkin for this season.
Do you like to carve or paint pumpkins? Have you ever tried painting a pumpkin? How it turned out? Leave a comment!
Related fall articles:
- 10 Printable Halloween Wall Art
- 7 DIY Ways to Decorate for Fall (without spending a lot of money)
- Fall Printable Wall Art Set