
DIY Snowflakes with toilet paper rolls
Do you want to decorate your home with beautiful DIY Snowflakes this year? I will help you!
Learn how to make these cheap and easy snowflakes with toilet paper rolls! Follow the step-by-step instructions to create beautiful DIY decorations. These snowflakes are the perfect Christmas ornaments and hanging Winter decoration that every beginner crafter can make.
I enjoyed creating my first toilet paper roll craft (which was a mandala). And I’ve decided that I’ll make other crafts with this technique.
So, when I came up with the idea of creating DIY snowflakes, I knew that the time has come for my paper tubes in the back of the craft cabinet to shine again!
Let’s dive in! How to make easy snowflakes?

Supplies for the DIY snowflakes
I have some good news for you! You can make these stunning snowflakes for cheap, or even for free! It’s possible that you already have everything at home. These are the few supplies and tools you’ll need:
- toilet paper roll or paper tubes,
- scissor,
- pencil,
- ruler,
- hot glue gun + hot glue sticks,
- plier (optional),
- paint (tempera, acrylic or spray paint) and other decoration elements (optional).

Toilet paper roll snowflake instructions
STEP #1 – Preparing the tubes
Flatten the tubes with your palm and add marks at every 1/2″ at both edges on the toilet paper rolls. Connect the dots with the ruler (use light strokes).
STEP #2 – Cutting the rings
Make sure that you’re using a sharp scissor.
Pinch at the tip of every line, and hold the tube pressed tightly between your fingers. You’ll be able to cut even, parallel rings.
TIP! If you’re having a hard time keeping the paper roll pressed down and cutting at the same time, use clothespins, and pinch one or both edges for more security and precision.
STEP #3 – Shaping and designing
Create a few shapes with the paper roll rings. You can also look for snowflake designs on the internet and create similar elements. Create 6 or 8 pieces of the same parts.
Start designing your snowflakes!
Stay tuned! I’ll create a video with several different toilet paper roll shapes, but I couldn’t cut out the time for it. (Hopefully, in a few weeks, and before Winter, I’ll be able to upload it.)
Toilet paper roll shapes inspiration
Easy DIY snowflake designs

It’s easy and fun to come up with snowflakes designs, but I know that there are some moments when creativity just won’t kick in. You sit at the table, experimenting for hours and nothing seems right. Ugh!
Can you relate?
I wanted to help you through those moments or give some inspiration for starting.
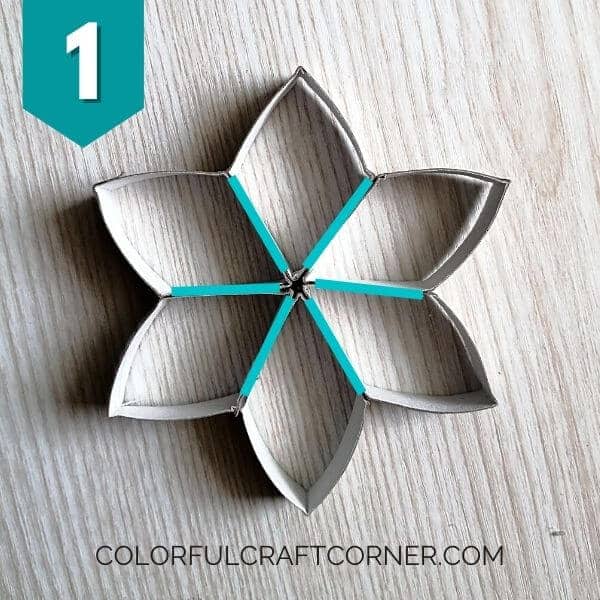
NOTE! The blue lines on the photos show where I’ve added glue. They also indicate approximately how much, just a dot or a long line of glue.
The name of the elements is fictional. You won’t find them anywhere else. I just had to come up with a name to identify the different parts.
So let’s check out my six DIY snowflake designs.
Snowflake design #1
- Glue the six leaves together.
- Attach the small ‘roofs’ with the long crystals, just at the top of the smaller ‘drops.’
- Arrange the necklace-like layer around the middle part.
- Glue every tip to the bottom of the ‘roofs.’


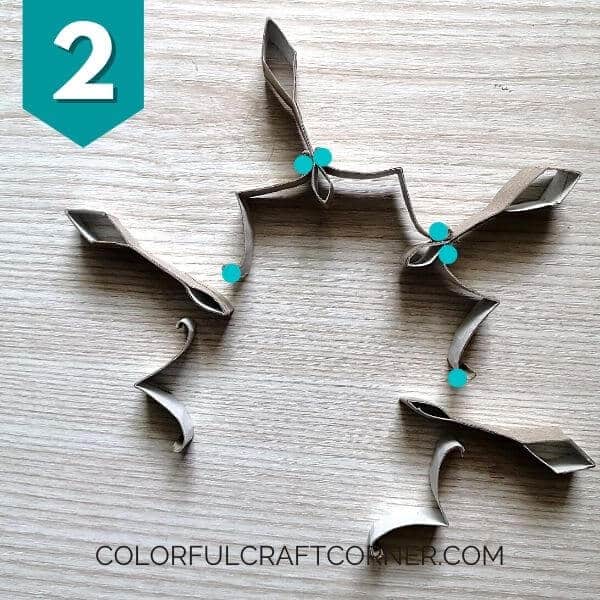

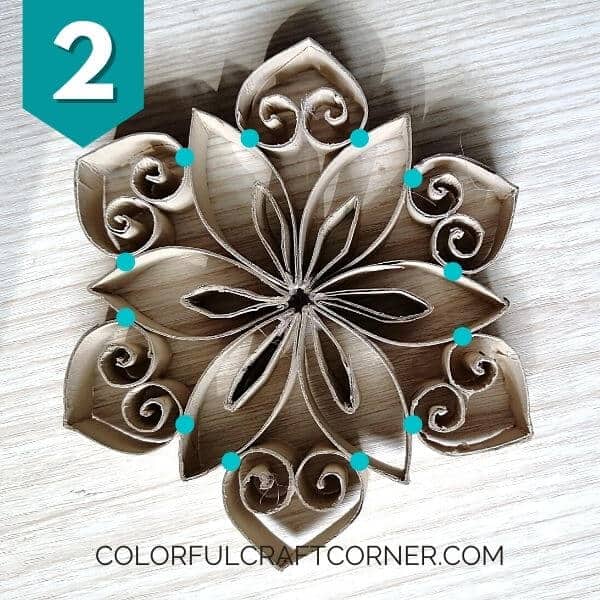
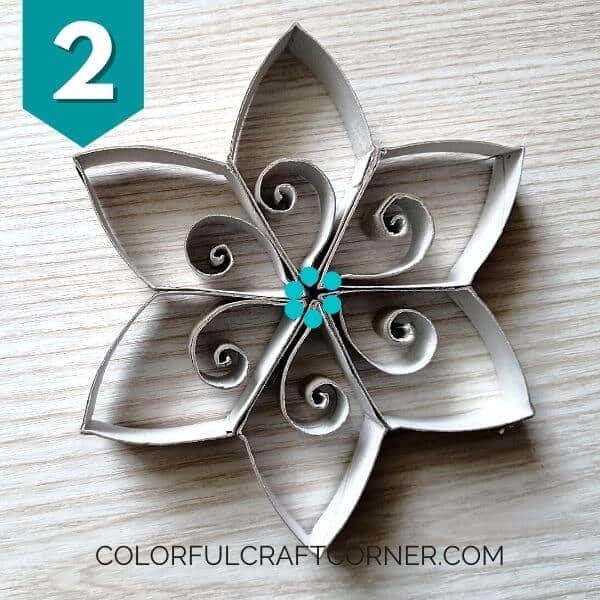
Snowflake design #2
- Create the middle with the ‘double-petals.’
- Add in the swirly hearts.
- Attach a ‘double-leaf’ to every tip.


Snowflake design #3
- Glue the diamond together to create the base.
- Arrange and fix the swirly little ‘fish’ elements.
- Add in the gaps the small buds.


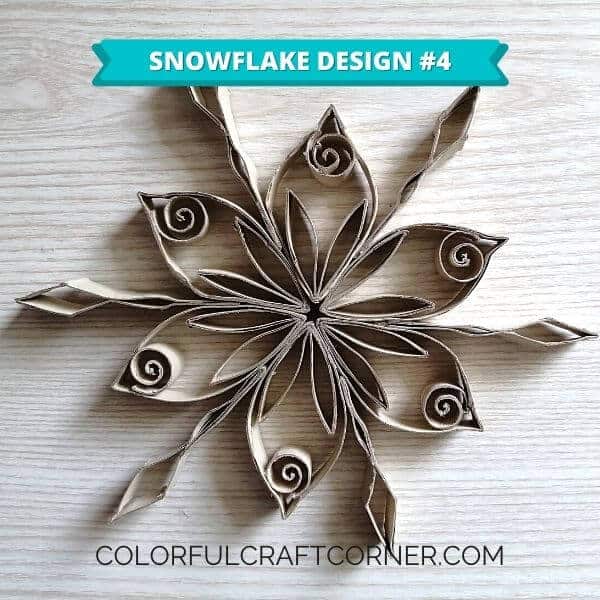
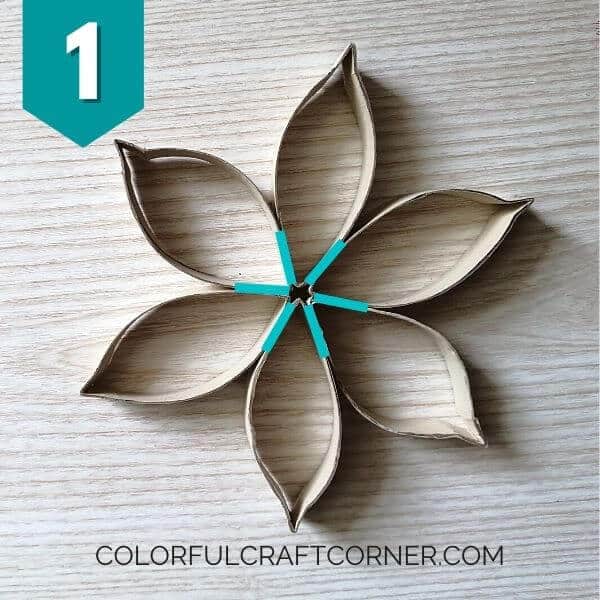
Snowflake design #4
- Create the base with the large teardrops.
- Glue in a ‘double-leaf’ in each teardrop.
- Fasten the swirls at every tip.
- Glue the spears between the gaps.


Snowflake design #5
- Glue together the rhombs.
- Attach the long swirls to the middle.
- Connect the ‘double-leaves’ with the round buds.
- Place and fasten the combos to every ‘vale.’


Snowflake design #6
- Glue the ‘double-leaves’ together to create the middle. GLue them in between to make them more even.
- Add a ‘double-petal’ to every other gap.
- Connect the ‘tendrils’ with the short buds.
- Add a combo to the alternative, ’empty’ gaps.


How to paint toilet paper rolls for your craft
I wanted to dedicate a separate section for painting the paper tubes. You can use these tips and recommendations for other toilet paper roll crafts too.
I like the natural color of the ‘naked’ toilet paper rolls. The tubes I used were white on the inside, so they had a different contrast. If you don’t like the cardboard color, or the paper rolls have some smears or stain, cover them with paint (NOTE! Paint won’t stick on greasy stains).
I had some left-over paper tubes from a previous craft, that had a coat of acrylic paint. Even though they were covered nicely, the color was pretty thick, so it made shaping the elements harder and even made it to crack, especially when I had to do the swirls. So I’ve done a little experimentation.
Here are a few recommendations on how to paint the cardboard rolls:
- Use tempera, acrylic paint, or spray paint (I’m not particularly eager to use spray paint. It’s harder to control and color the inside. Although they are perfect for adding an extra charm after making the snowflakes),
- Apply color in a thin layer (thin up the paint with water and cover the tubes with a brush or sponge).
- In my experience, it is better to paint the tubes before cutting them up. For simple shapes, you can also paint after assembling the paper snowflakes. Applying paint on the swirly or compound elements is challenging.
No-Paint DIY snowflake version
Do you want snowflakes faster?
Do you want to skip or just not into painting?
Are you short on time and without a pile of toilet paper rolls?
Buy a few sheets of cardstock and slice them up. Patterned versions are also available on the market. The results will be spectacular! (Pst! there are also in Winter editions.)
How to further decorate the snowflake ornaments?
There are several options to add further adornments to the DIY snowflakes make them sparkly and full of Winter or Christmas vibes. Check out these ideas:
- glitter (glitter paint or dip them in glue and glitter afterward),
- beads (glue plastic or acrylic beads on the surface or in the small holes),
- crystals (use your glue gun to apply them or buy ones with a sticky back),
- fake snow spray (less is more; if you apply it excessively, it may cover the fine details you worked so hard for),
- add them a shiny backdrop (link to a tutorial on Instructables),
- apply small wood, lace, or doily ornaments,
- give a contour by dipping in a contrasting colored paint.
How much does it cost to make a snowflake?
Technically, toilet paper roll snowflakes are free if you use toilet paper and have some craft tools at home.
You may need to pay for the hot glue if you’re out of stock, paint, and other embellishments if you decide to color or decorate the snowflakes, which isn’t a must.
And the best part? After Winter, you can store them in a box and use them again next year.
What can you do with the paper tube snowflakes?
These paper tube ornaments are very versatile. They are perfect ornaments on their own and also used as components of other crafts. Let’s see a few DIY decor ideas with snowflakes:
- hang them from the ceiling or the curtain rod,
- make a garland,
- turn them into a wreath,
- a large snowflake can be the perfect table centerpiece or plate holder for the cold season (NOTE! Do not put heavy objects on it. It may hold a decorative plate, bowl, or vase that are not too heavy),
- attach multiple snowflakes to create a table runner,
- wall art or backdrop for a Winter party,
- glue a stick in it to decorate cakes or gift baskets for Christmas,
- smaller snowflakes would also look nice as gift embellishments or gift tags,
- turn them into Christmas tree ornaments or a topper.

Tips, tricks, and hacks for the most beautiful DIY snowflakes:
- The quality of the paper roll – Some paper tubes and paper rolls have low quality, meaning: layers that come apart, soft and uneven sides. Also, keep in mind that the tube’s size, quality, color, and diameter may differ from brand to brand. So, within a snowflake, use paper rolls from the same brand.
- Precision in the preparation– Sloppy elements won’t result in sharp and stunning snowflakes. In real life, the main characteristic of a snowflake is the flawless crystals. I highly recommend using pliers to create crisp edges for the best results.
- Ring width – Some crafters make their snowflakes with 1″ rings or even more prominent. I don’t like to work with too broad pieces because they are harder to shape and also paint. I always make 1/2″ rings because they’ll keep their shape after modeling, plus stability after gluing.
- Size of the snowflake – The more significant the snowflake, the wobblier it gets. Also, make sure that you have enough connecting pieces on not just long elements.
- Symmetry and proportionality– It is critical to make beautiful DIY snowflakes. The easiest way to keep the symmetry is by designing one ‘branch’ than multiplicating it six or eight times. (I like to make snowflakes with six ‘branches’)
Conclusion about the DIY Snowflakes
As you could see, creating stunning decorations shouldn’t cost you an arm and a leg. Or even talent and specific skills.
These paper tube snowflakes are chic and beautiful, cheap, and easy to make. And also very versatile!
I think I’ll add a few smaller ones to our Christmas tree this year.
Have you ever made crafts with toilet paper rolls? Which snowflake was your favorite?
Leave a comment!
Related crafts on a budget:
- DIY Pinecone Heart Ornament,
- DIY Wire and Nail Polish Mini Wreath Ornaments,
- DIY Mini Gnome with an Egg Carton,
- Toilet Paper Roll Mandala Wall Art,
- Can You Make Crafts With Toilet Paper Rolls?
love the tutorials
The fun part is that depending on what you decide on for the ‘center’ (the beginning), you will end up with different snowflake designs. I’ve made 25 so far and every time I start a new one, I think, ‘I have no more ideas.’ But then I get an idea for making the central shape and as I build outward from that, it becomes unique and surprises me. Only two were close to the same, so I embellished the second one to make it more elaborate. In my country, toilet paper rolls are all the cheapest, soft grey recycled paper, and are printed with the name of the toilet paper manufacturer, so I’ll definitely be carefully painting these at least on the largest, exposed elements. It’s just a hobby, so I’m open to experimentation and seeing how it goes. I’m thinking of using them to decorate the front panel of the choir loft in a medieval church where we have Midnight Mass every year. I’ll hang them among the fairy lights from the railing using invisible fishing line.
Yes, I feel the same. I could make lots of new design. It is so much fun! 🙂