
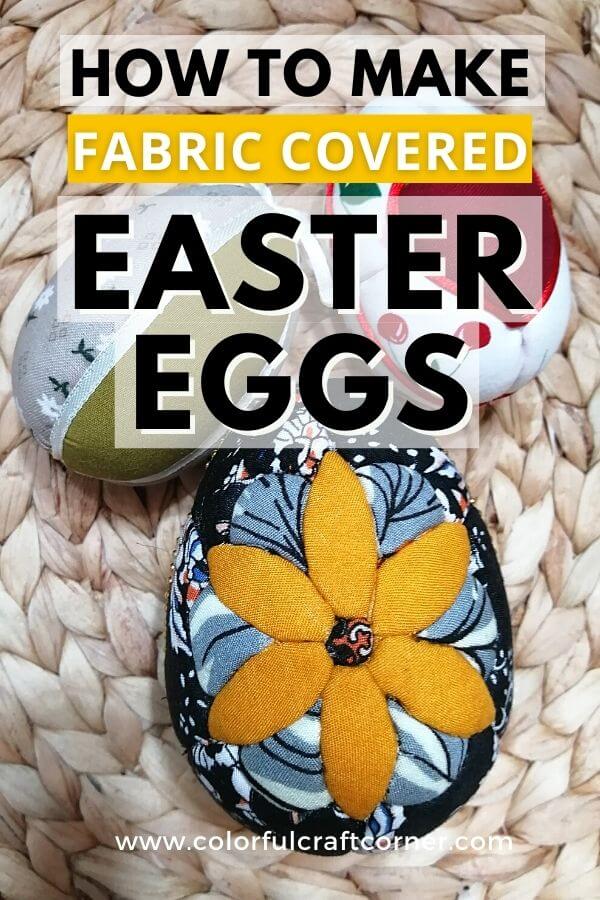
DIY Fabric Covered Styrofoam Easter Eggs
Are you looking for beautiful Easter eggs that will last you for years? This tutorial will show you how to make fabric-covered Easter eggs that are lightweight, stunning and you can customize them as you like. A super simple way to make Easter decoration! You can do it with kids too!
I was in 5th grade when our headmaster took me to a ‘camp’ around Easter. We had to perform a dancing act. The staff prepared us some crafting projects to pass the time while we were waiting for our turn. That was the first time when I made fabric covered styrofoam eggs.
Last week popped into my mind that I should make a few eggs since Easter is approaching. I wanted something that I can make fast; it’s colorful and breakproof or, in other words, toddler-proof (my sweet little boy loves to play with everything that is roundish and capable of rolling).
I had some styrofoam eggs from last year; I didn’t have the time to use them and lots of fabric scraps, yay! So it was decided!
The best part about these DIY Easter eggs is that they are super light, so you can easily decorate your Easter tree, but they also won’t break if they fall off.
Now, let’s get started!
DISCLOSURE: THIS POST MAY CONTAIN AFFILIATE LINKS, MEANING I GET A COMMISSION IF YOU DECIDE TO MAKE A PURCHASE THROUGH MY LINKS, AT NO COST TO YOU. PLEASE READ MY DISCLOSURE FOR MORE INFO.
Tools and supplies for the Easter eggs:
- styrofoam eggs,
- fabric scraps or fat quarters,
- craft knife,
- marker,
- scissor,
- templates (optional),
- lace, ribbon, buttons, pearls, soutache, etc. (optional for decorating),
- glue if needed to attach embellishments.
What kind of fabric to use for this Easter egg craft?
Both the cotton and synthetic fabrics work for this craft. Opt for soft and thinner materials. Thick and stiff fabrics are hard to work with.
Also, the synthetic fabric may slide while you work and harder to keep in place. But worth trying if you have some really nice materials.
You can play around with glittery, shiny, faux leather, metallic fabrics. They can really add a nice and unique touch to the Easter eggs.
The Spring Garden fabric bundle and the Spring Time patchwork fat quarters are perfect for this Easter egg craft. If you want more patterns, this assorted bundle is great (the fabric is pretty thin; I wouldn’t recommend it for sewing, but for this craft is perfect).
How to cover eggs with fabric?
Technically the easiest way to cover styrofoam eggs is using Mod Podge and stick fabrics scraps on the surface. But I’m not too fond of this method; for me, it seems a little unfinished.
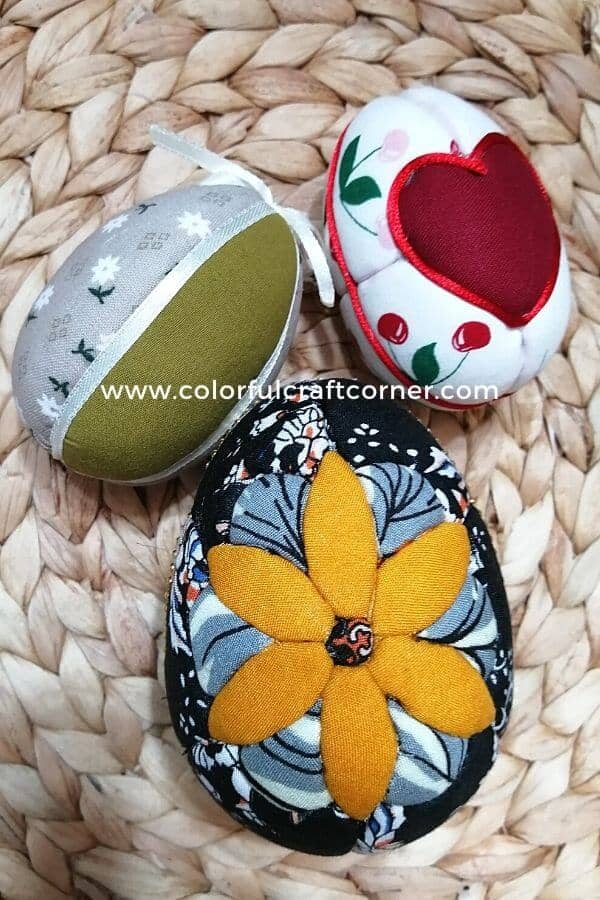
That’s why I chose the ‘tucking’ method (lol. I made this up!) I really like the patchwork-like outcome, and it’s better for combining different patterns and fabrics.
How to make a template for the fabric easter egg?

For more intricate designs, you should create a template. It’s not complicated and takes the design to a new level.
The first step is to divide your eggs with the marker. Use thin rubber bands for guidance. Depending on your design, you may want to divide it in half, quarters, or more sections.
I like to trace the egg on a piece of paper and draw the design I wish to create. Then I cut out the pieces and trace them on the egg (adjusting them if needed). Use these small templates for cutting out the fabric pieces (like the image above).
Leave a 0.5 cm (1/4 inch) seam (tucking) allowance.
They don’t have to be super precise. Just make sure they are rather bigger than the part they should cover. You can always trim the excess.
I have to point it out. You don’t have to create templates. You can draw the egg’s design directly on the surface and cut fabric scraps that would cover the area, tuck it all around, trim the excess and push in the remaining edges. But I’ve found that having templates makes it a lot easier to work with. It is more precise and professional looking.
Dividing the egg is not always necessary; I’ve seen an amazing fabric covered styrofoam egg with the mermaid tail pattern. You can also create dragon egg-like ornaments with metallic fabrics (for Game of Thrones fans).
Cloth-covered easter egg instructions
Creating fabric covered styrofoam eggs is super simple and an inexpensive way to create Easter decorations!
STEP 1 – Create sections on the egg
(either dividing into equal parts or drawing a pattern).
STEP 2 – Cut in along the lines
Create 1/4 – 1/2 inch cuts along the lines. Hold the craft knife perpendicular to the egg. Be extra cautious if you have an intricate design not to cut off a piece by accident.
STEP 3 – Cut up fabric scraps
The fabric pieces don’t have to be the same shape. You can trim them while working. But make sure they are big enough to cover the selected area and push in enough fabric to keep them in place.
NOTE! A thin edge won’t keep the fabric in place. Make sure to tuck in at least a half cm (1/4 inch) wide fabric at the edges.
STEP 4 – Cover the Easter egg with fabric
One by one, cover every section with the selected textiles.
STEP 5 – Decorate (optional)
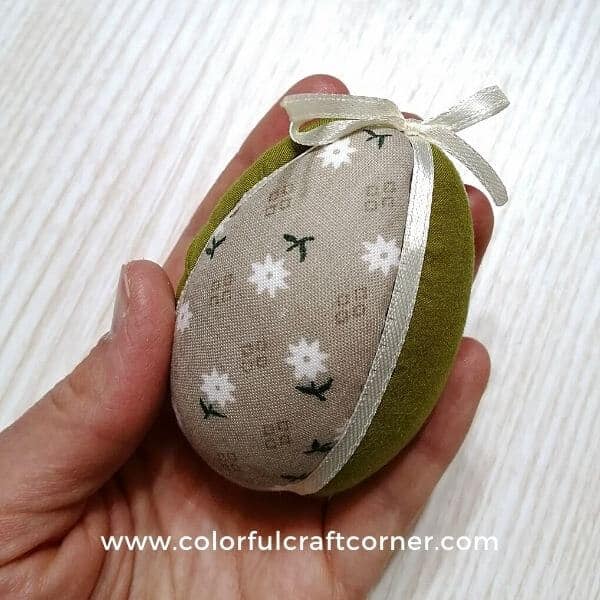
Small embellishments can take your Easter egg to a new level. Contour the sections with thread or thin ribbons. Tie a bow or create a lace belt on the egg. Scatter beads or rhinestone for an extra charm.


Get inspiration by looking at quilting patterns or this site; it has amazing egg ornaments made with this technique.
Experiment with colors and patterns!
Check out the video tutorial to see the process step-by-step.
How to decorate your fabric wrapped easter eggs
I believe that in most cases, less is more. I usually don’t add decorations to eggs that have multiple patterned fabrics. Or just very subtle ones like a thin ribbon to contour a part or small beads to add shapes that I couldn’t create with the fabric.
Simple eggs are the ones you can truly decorate with all sorts of fun stuff. And let’s see what you can do!
- Add contour to emphasize (or hide) the sections or a certain shape with metallic thread, thin ribbons, soutache, sequin trims, or chain.
- Create a ‘belt’ for the egg to integrate the different fabrics applying lace, ribbon, leather, or other trims.
- Scatter embellishments all around the Easter eggs. My favorites are buttons, mini pom-poms, flat-back pearls, beads, and rhinestones.
Tips and Hacks:
- Use a soft pencil to mark the egg to avoid stained fingers and hands (like the ‘bloody’ fingers I had in the video),
- Wash new fabric if it’s stiff (softer materials are easier to push in the cuts).
- Thrift store finds are perfect for this craft (The big floral egg was made with two blouse sleeves I’ve found in a second hand store).
Final thoughts about the fabric covered styrofoam easter eggs
Creating stunning Easter eggs is so simple! This craft is not only easy but also cheap, and you can create handmade ornaments and decorations for the holidays that will last you for years.
Grab a few styrofoam eggs, fabric scraps, and start crafting!
Use this method to create Beautiful Christmas globes!
Have you ever tried covering eggs with fabric? Leave a comment!