
How To Make An Illuminated Wall Art
Have you ever wished for stunning wall art, but couldn’t find the perfect fit? With this easy tutorial, you can learn how to make a canvas wall art with lights.
If I want to be 100% honest, I think most led canvas arts are kind of cheesy and kitsch. There are a few exceptions, for example, illuminated Christmas wall arts, but that’s the point of this holiday.
Even though I’m not fond of the whole incorporating led as home decoration or modern design, I’ve found two light-up picture ideas on Pinterest, one with dandelion and one with a moon and quote. And since then, they’ve stuck in my head and bugged me to create one of my own.
And lucky me, my sweet baby boy was born and I’ve decided to create a light-up wall art for him, which will function in his room as a night light.
The canvas art was inspired by a series of cute illustrations I’ve stumbled upon on Pinterest (in many cases, this platform is my inspiration, my muse). They are from this awesome Etsy store Lower Woodland Studio, with a lot of adorable art prints for children.
How To Make A Canvas Light Up Wall Art

Creating an illuminated wall art is not as complicated as you may think. You’ll need a beautiful design or idea, some planning and time to create it. In this step-by-step tutorial, I will show you how to create a canvas with lights behind it for the kid’s room. You can customize it for your own taste, or change the elements for an adult wall art.
Tools and Supplies for the Illuminated Wall Art:
- canvas (30×40 cm or 12×16″),
- acrylic paint (I’ve used matte indigo and beige colors),
- foam brush and regular brush,
- felt or foam sheets,
- scissors and craft knife,
- needle and embroidery thread (optional) + thin jute rope,
- 1 battery operated lights,
- hot glue gun,
- marker or pencil,
- tape,
- nail,
- my or your templates.
LED Canvas Art Instructions:
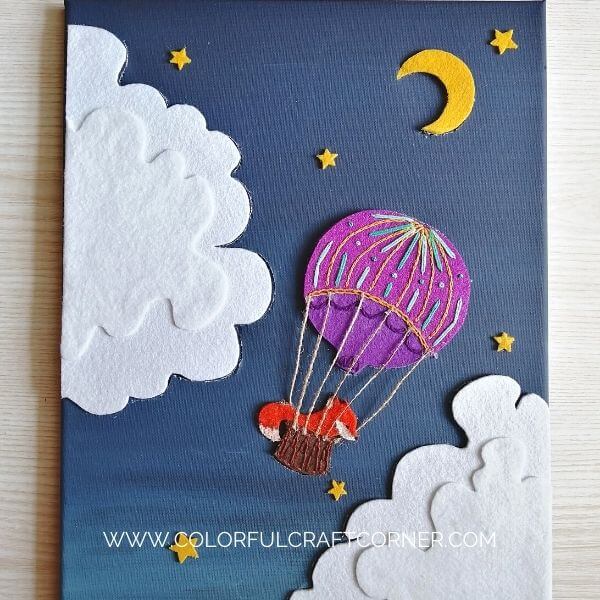
Paint the canvas

I used indigo and beige matte acrylic paint to paint my black canvas as a base to create an ombre effect. You can paint it with a brush but using a foam brush or a piece of sponge (As I did. Learn from my mistake and use gloves. My hands looked like I jumped out of the Smurfs movie.)
Use long, horizontal strokes while painting to blend in the colors. I like to use a sponge because a brush may leave unwanted strokes; with a sponge, you can achieve a smoother surface.
My sweet little boy is really into walking these days, but still wobbles a lot, so I have to run after him all the time. He also cut down on his nap so my time these days is limited. Aaand, that’s the reason why I’ve forgotten to take photos on how I achieved the ombre effect on the canvas.
I’ve found a helpful video that explains everything. She does it a little differently than me, but with the same beautiful ombre results. She also shares helpful tips.
NOTE! Make sure you cover the canvas with a thick layer of paint. I have to redo this wall art. At my first try, I used a white canvas, and the ombre color at sunlight looked stunning, but after installing the lights was awful. For the second try, I used a black canvas. If you don’t have a black one, you can either add a coat of black acrylic paint first or paint the back of the painting. Before taping, make sure the fairy lights won’t shine through at unwanted spots.

Cut out the shapes
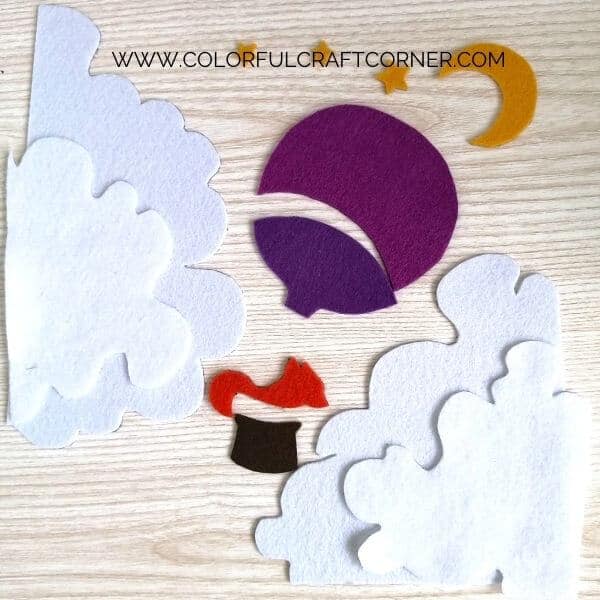
I used soft and stiff felt for the clouds and other decorative parts because I like the soft feel and vibrant colors of the felt sheets. And I also wanted to decorate the hot air balloon with embroidery. The felt was around 2mm thick, so they’ve also added a lovely 3D effect after layering it.
Print out the free templates and transfer them to the felt. After you sign up below, you get access to the Library where I host the templates.
I’ve traced it with a thin sharpie, but you can also use other image transfer methods for more accuracy. I have an in-depth guide about crafting with felt it also covers how to transfer designs onto the felt in various ways.
You may need to adjust the size of the elements if you decide to use a smaller or larger canvas. The templates also work on a square 12×12″ canvas.
Decorate the elements
I like to decorate felt with embroidery. You can also use other embellishments like beads, ribbons, etc. or paint on the felt with acrylic paint or markers. If you need more inspiration, I have a section in my guide, I mentioned above, about decorating felt crafts.
I painted the fox with acrylic paint and a fine tip, black sharpie, because it was such a small piece, and I didn’t have the time and patience to embroider it. But you can do it if you wish. I would recommend decorating it before cutting out the fox shape, be careful not to cut the embroidered part.

If you don’t know how to embroider or you just simply don’t want to add it, use foam sheets or cardboard. Cut out and glue on shapes for decoration, or grab some sharpies to decorate them. They will also look fabulous if you leave them empty.
For decorating the hot air balloon, I used the following embroidery stitches: chain stitch, split stitch, lazy daisy stitch, french knot, running stitch. Also, I’ve cut the template and used two colors to create the balloon (pink and purple). I’ve connected the parts with the chain stitch. You can use one color and add a decorative line.

If you’re not familiar with the embroidery stitches here is a video that will help you out.
Assembly the picture
Arrange all your felt/foam/cardboard pieces on the canvas.
I glued on the pieces in the following order: the bottom cloud layer, the upper clouds, the hot air balloon, the basket, the jute ropes the fox, and finally the moon and the stars.
How do you add lights to a canvas painting?
Choose your string light length based on your canvas size and how many stars you want to add to your wall art. I’ve also wanted to highlight the clouds and the hot air balloon, so I needed some extra lights to light-up the outlines.
Follow these easy steps:
- cut the outlines,
- make the holes,
- arrange the lights,
- secure the battery holder,
- secure the lights.
You can cut the outlines before gluing on the decoration. For more precision, I used the felt shapes as a guide, draw the contours on the canvas, and cut them out with the craft knife and scissor.

Add all your embellishments on the canvas.
To create different sized stars, punch holes with a thick needle and a nail. When you are satisfied with the look start attaching the lights.
TIP! Turn the canvas towards sunlight or other light sources to see where to add more stars. It’ll also give you an idea of how the canvas will look after attaching the light string.
Start with securing the battery holder onto the canvas. The best way to attach fairy lights to the canvas is by pushing the lights through the holes and securing the cords with tape. If you have a string light with smaller LEDs, like the one I’ve used, make sure they are taped tightly at the holes.

Turn on the lights and voila! Now you have an adorable backlit canvas wall art!

Final Thoughts About The Backlit Wall Art Canvas
As you can see, creating an illuminated picture is easy. You can create a unique night light for your child’s room or your bedroom.
This DIY wall art is stunning and easy to make. Also, it doesn’t require long hours of work. Embroidering the hot air balloon took me the most time, but if you decide to skip that and decorate with sharpies, you can knock out this craft project in an afternoon.
Feel free to adjust it to your taste or home decor style. If you decide to create this craft, send me a picture, and I’ll feature you (if you’d like).
Did you like this light-up canvas wall art? Have you tried creating something similar? Leave a comment!
Related DIY Wall Art Articles:
- Embroidered Felt Lion Wall Art
- Paper Mandala Wall Decor
- Toilet Paper Roll Wall Art
- How To Stencil On Walls